Google Pay Integration
Google Pay integration enables customers to push their debit and credit cards from the Infinity mobile banking application into Google Wallet on their Android devices in a secure manner to make payments via Google Pay using the debit and credit cards.
This section explains the process of integrating the credit or debit cards to Google Pay wallet. The following are covered:
- Scope
- Prerequisites
- Enable NFI for Wallet
- Issuer Host Methods and APIs
- Common Wallets Utility File
- API for Creating Tokenized Data for Wallets (Visa)
- Limitations
- Functional Flow Video
Scope
The Issuer APIs are used to add the cards to Google Pay wallet for In-app provisioning. These APIs encrypt the card data and generate a unique card ID. The generated unique card ID is saved in the native wallet for secure payment.
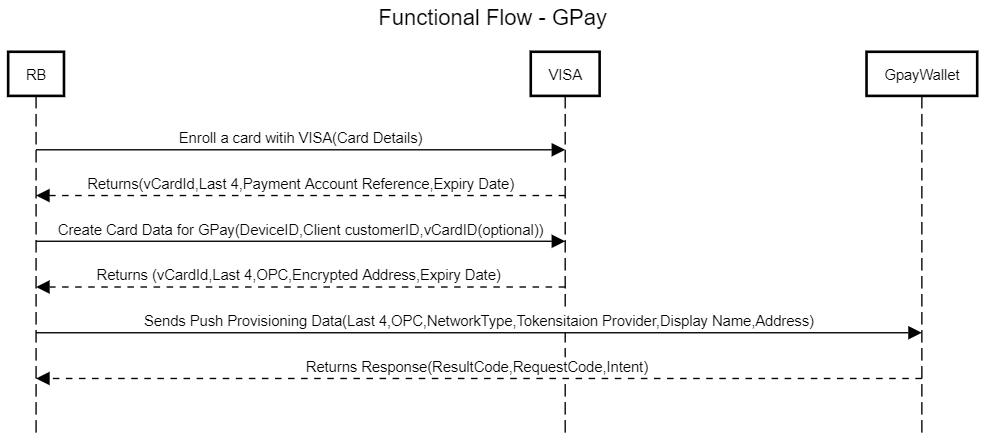
Functional Flow
The following diagram depicts the functional flow of integrating credit or debit cards to Google Pay wallet.
Technical Flow
The following sequence diagram depicts the technical flow of integrating credit or debit cards to Google Pay wallet.
Prerequisites
Following are the prerequisites to integrate credit or debit card to Google Pay wallet.
- Request Access for GooglePay Developer Account to get full access to push provision APIs.
- Download TapAndPaySDK.
- Use the Sample application to refer methods available in SDK for push provisioning.
- Update maven URL local path to the folder into which the SDK is unzipped.
- Access to card provisioning APIs from the Card Provider.
- Banks or Card Issuers must already have the capability where the cards issued by them can be manually added to Google Pay. The Infinity banking application provides a mechanism to push the cards into Google Pay and then it follows the business as-usual flow that is followed while adding cards manually.
Enable Native Function Interface (NFI) for Google Pay
This section explains the procedure to integrate Google Pay SDK with Infinity mobile banking.
- The NFIs and Utility files are provided as part of Retail Banking code base and disabled by default. If wallets functionality is required, the implementation team must generate the build by enabling NFIs and wallet specific dependencies.
- A customer can choose to remove the NFIs and wallet integration files and only WalletsUtility.js file is required. The methods in WalletsUtility.js file will handle the APIs unavailability.
Creating Library in Android Studio
- Go to File > New > New Module >Android library.
- Provide Library name, Module name, package name, and minimum SDK.
- Click Finish.
Integrating Google Pay SDK in Android Studio
- Add the following line into dependencies of build.gradle file of library(Module) project to pull tapandpay dependencies into the project:
implementation com.google.android.gms:play-services-tapandpay:17.1.0. - Add the following line into allprojects of build.gradle file of Project:
maven { url // Path to the TapAndPay m2repo folder } - Go to File > Sync Project With Gradle files.
Integrating Kony Dependent Libraries for NFI
- Copy konywidgets.jar file in library's lib folder.
- Add the following line in the library's build.gradle file in dependency section if not already there.
implementation fileTree(dir: 'libs', include: ['*.jar']) - Go to File > Sync Project With Gradle files.
Generating AAR file and Importing into Visualizer
- After all the necessary code for Integrating SDK is ready and all dependency jars are added, build the Android library project to generate the AAR file.
- After generating the AAR file, remove konywidgets.jar from the file because konywidgets.jar creates duplicate class error by default as it gets pulled while building in Visualizer.
- Add the AAR file to generate NFI and import the same into Visualizer application.
Changes to be Done in Visualizer Project Settings
Add following files in the following path of Visualizer project:
Path: Project Settings > Native > Android Mobile/Tablet > Gradle Entries > build.gradle entries to suffix
allprojects {
			repositories {
			maven {
			url //Path to tapandpayM2 Repo
			}}}
			dependencies {
			implementation 'com.google.android.gms:play-services-tapandpay:17.1.0'
		}
- For Generating .aar file, create a library project, or else, it will create an application project by default which in turn generates .apk.
- The gradle file refers to (build.gradle Module :<projectname>:<libraryname>)
- If any additional functionality needs to be added, add in the Android project, generate AAR file, and then import into Visualizer.
Issuer Host Methods and APIs
This section explains the Google Pay supported methods and APIs. The following API methods must be implemented:
boolean getStatus()
Returns true currently because there is no method provided by Google Pay to identify wallet installation.
getAllCards(final Function callback)
- Params: Function Callback - Triggered on success or failure.
- Invokes: It invokes listTokens() method in Google Pay SDK which returns all the cards added in Google Pay registered by an application with the same Android package as the caller.
- OnSuccess: Return all the tokens as data that were added into Google Pay by using the registered package name and a message success to identify in JavaScript layer.
- OnFailure: Return error message to identify it in JavaScript layer.
addCard(Context context,JSONObject cardDetails)
- Params
- Context: It accepts Kony context as arguments which acts as activity callback on success/failure.
- JSONObject cardDetails which contains Data to initiate pushTokenize
- Invokes: It internally invokes pushTokenize method which takes KonyActivity context, PushTokenizeRequest(Constructed from CardDetails param) and REQUEST_CODE_PUSH_TOKENIZE.
- OnSuccess/OnFailure: It returns RequestCode,resultCode, Intent to Javascript layer with Result_Ok message to identify success or failure
NOTE: Reference: Refer to Wallet Operations of Google Pay Android push provisioning.
Common Wallets Utility File and APIs
This section explains the common utility files and APIs.
NOTE: If a customer chooses to remove the NFIs, the methods in WalletsUtility.js file handles the APIs unavailability.
The WalletsUtility.js file is a common utility file that communicates between the integration layer and Retail Banking code. The utility file has the following methods:
API to check whether wallets are supported in specific device
isGooglePaySupported() - Returns true if Gpay is supported or else false. Returns false for iOS devices in India.
API to check whether card is already added to wallet
isCardAlreadyAdded_Gpay(cardIdentifier,callback) - Method to check if card is already added to the wallet or not.
API to add cards to wallet
addCardtoGPayWallet(cardsData,succCallback,errCallback) - API to add card to Gpay wallet.
NOTE: CardsData in params is tokenized cardData which differs from wallet to wallet. In-app provisioning data obtained from issuer APIs (VISA) is used in Retail Banking code base.
API for Creating Tokenized Data for Wallets (Visa)
This section explains the in-app provisioning process and related APIs.
NOTE: In the current release, Visa provider is used for in-app provisioning. Refer to Visa in-app provisioning for more information.
Visa In-App Provisioning currently supports Universal Card Enrollment and In-App Provisioning for Apple Pay, Google Pay, or Samsung Pay.
Universal Card Enrollment API enables Visa clients to digitally register accounts with Visa in real time. Once registered, client developers receive back a universal card identifier, that can be used inter-operably for accessing certain other Visa services like Visa In-App Provisioning without directly having to handle sensitive PAN data or without having to re-register and maintain card data repetitively across multiple Visa products in the future.
In-App Provisioning API enables clients to request encrypted card data using the universal card identifier from Universal Card Enrollment API. Clients can pass this encrypted card data payload to Apple Pay, Google Pay, or Samsung Pay wallet for tokenization. This token then becomes active on the Pay Wallet and is pushed to the consumer's device.

The following APIs are used in the Retail Banking application for Google Pay:
| API | Description | API Reference |
|---|---|---|
| enrollCardForVisa | Create a card object (if it doesn’t exist) and link it to an existing customer record. | Reference Link |
| createCardDataForGooglePay | Generate encrypted card data to perform in-app token provisioning for Google Pay. This is an orchestration service. | Reference Link |
enrollCardForVisa
{{URL}}/services/data/v1/RBObjects/operations/Cards/enrollCardForVisa
Sample Request
{

    "paymentService": "applePay",
    "cardID": "115",
    "nameOnCard": "Digital Issuance",
    "cvv2": "123",
    "billingAddress": "[{'name': 'Digital Issuance',
'line1': '12301 Research Boulevard',
'line2': 'Research Boulevard',
'line3': 'Visa USA','city': 'Austin',
'state': 'TX','countryCode': 'US','postalCode': '78759'}]"

}
Sample Response
{

    "vCardID": "v-123-ba75fedc-cd55-40ef-8187-77fabab34501",
    "paymentAccountReference": "V1234567890124514236833852412",
    "last4": "2412",
    "expiryMonth": "01",
    "expiryYear": "2021",
    "opstatus": 0,
    "httpStatusCode": 0

}
createCardDataForGooglePay
Orchestration service created for createCardData.
{{URL}}/services/data/v1/RBObjects/operations/Cards/createCardDataForGooglePay
Sample Request
{
			"paymentAccountReference": "V0010014619294087332641009370",
			"deviceID": "uztEQocBRFrbK5hCgcDbxqw_",
			"clientCustomerID": "ae25OGhjZTk2dsr452dgsr51",
			"paymentService": "googlePay",
			"cardID": "4514236833852412",
			"nameOnCard": "Digital Issuance",
			"cvv2": "123",
			"expiryMonth": "01",
			"expiryYear": "2021",
			"billingAddress": "[{'name': 'Digital Issuance','line1': '12301 Research Boulevard','line2': 'Research Boulevard','line3': 'Visa USA','city': 'Austin','state': 'TX','countryCode': 'US','postalCode': '78759'}]"
		}
Sample Response
{
			"vCardID": "v-123-761834df-fc73-4386-bcfa-a4d0e8c4db01",
			"paymentAccountReference": "V1234567890124514236833852412",
			"opaquePaymentCard": "eyJhdWQiOiIxODk5NzZhNi0yZmFjLTRlZDEtOTM0ZS03MjY5NmVhMDgxMzEiLCJraWQiOiJYS1ZYNUlHNTVDWTFRM0FVR0JLQTExbV9VNGR2b2FROVVzZ3lESUxqQjNUempCYmU4IiwiaXNzIjoiYmJlZWUwMzgtNDgzMS00MjUzLWE3MjItMHY3NWNsMTNuNzFkIiwidHlwIjoiSk9TRSIsImNoYW5uZWxTZWN1cml0eUNvbnRleHQiOiJTSEFSRURfU0VDUkVUIiwiZW5jIjoiQTI1NkdDTSIsInRhZyI6ImlvSWt0dThjVDFkUmoxTU1RNlJEc2ciLCJpYXQiOjE2MTYwNzE5MjAsImFsZyI6IkEyNTZHQ01LVyIsIml2IjoiWE9EOXcxZk5KM202V0cxZiJ9.mU0XjWoN5cq4VQ4aJ5VPTOMzt5SMO7ZDyJ1rpD0Goyw.Kl7lTB4kf3vhmMuk.bCYT6Ia3NuzrPaVQsAR9H4hoowhXDmJ76O7AM8p2fKYrrmEtoBuDOkb0jRe6AHlAAlZpRZFtj-QFOuzYRShOXIdecgN9Q2k8_Ah5LRs8BlNy5KJB6_cE_EGBk27CU-0bqUvvUpPMVPkNazrm9PqCWH6agovm2BjZHo02mhz4AgRNKIYcF29lmQJ6Su1YqCgO_v3I4Y13mfEdZm4EKt-GqaLA1jzi2rzWaPPNCXC-TFjn4Z_FuGl0nSLKY-sYOSiwRYDbDUrCwybCuHn9V0OQDL6ni_yCFXRy8Gdv27yof3fniPwHuFGZa9_7Ja1KhNEuoXPC4rZKRpJFchDc7vF3Ve8LpU-voU6g8-K1DdbIIqEoPzYMf0pmf57w6Nxmw1Q9OTHP4NowuH95UY0Kb0Zbsc7MTJpjlq1p64hWXaWy5nJjhOmaTUyfhggTGdQnGJOvbVUR3Zp5AQgKNqUIhwEP2DhAuOZh_v-WHvPfw9iCM0Bh-vI0KT9LCzeOC_s4IfHGbt67gNhALTHjziSkDE-ZvtAdb5HIZnFXeNpm7vir63lTB4oXc525NTWjSn1LfZbK-SJlvvpXHE9iAVPPiPtyt0jyfRgZkZ6T-7DYcgBYV_nG6H2CxiJKwkXxZHGSPG3fjDbIbBclq2-xJ2wE7ngerPzqjsuiNtjUHP33wQ.AFmmxCtKA6nBNVYUhuFpVw",
			"last4": "2412",
			"encAddress": "eyJraWQiOiJiNTFkZmEyMyIsImVuYyI6IkEyNTZHQ00iLCJhbGciOiJSU0EtT0FFUC0yNTYifQ.X1RG0TIrVeN97QwisDll_8X3WaI_6oHj-u87eazjPqVZBvnh2fo7m3GCu6AHsy1YeLNCJ9m_Aq_tweumZ67pAFdyaRKkiubHlPcBvmioqoNL-GJsoBIhztnMJbbIHp5qlAEQvo5KYxqcGPscJ1EC1VMm_xclESFhm_v9oAeAD8YQutiv3NiD-QQnxrIsNCfZ1dENYUOQXuHj5qvK90NKSpKz2UGdd2m_koYmvhBmqOg0zmc0GUd2C0knCuWS0Do4JQwREVYXifI5qhfUQjZnI0HmIoDU9S5MLeM0UnFubzcyzwc2FD_OpzmX6nPwqkwbFS0ATpBv9V3ifHPuj0pg6Q.dG-3twFvVj8evKGg.TMUUQdXXImHAypCmtaEJ2UbrdjFHmMyY1amKU1qlb9SwcfcSvUoPrameZBdYAD2oSWa5ivh5pCy8WuKkgsVAnS7fbhKJO-oU5TKp9ccGOauqNZIQno3fNTormRUWW6kdI4WxCr0jXgUu2PjViufVLD9fwlXTRzcP4Io4ks1Upn8xd3zVlnQ_9dEI0lZv07kVjeWsU5ihzn9c.xSTbj3aQOqWMwBOO_J2C4w",
			"expiryMonth": "01",
			"expiryYear": "2021",
			"opstatus": 0,
			"httpStatusCode": 0
		}
Limitations
- VISA Sandbox environment is used for card provisioning that has certain limitations. To test the flow end-to-end, it is a must to get a license for VISA Certification environment and go through the certification process. The process is the same for any other Card Provider.
- The end-to-end feature is not available in the demonstration system and therefore, refer to the functional flow video for a quick preview of the feature.
Functional Flow Video
In this topic
