Make Payment
You can use this feature to make payment between your own account and transfer money to other account.
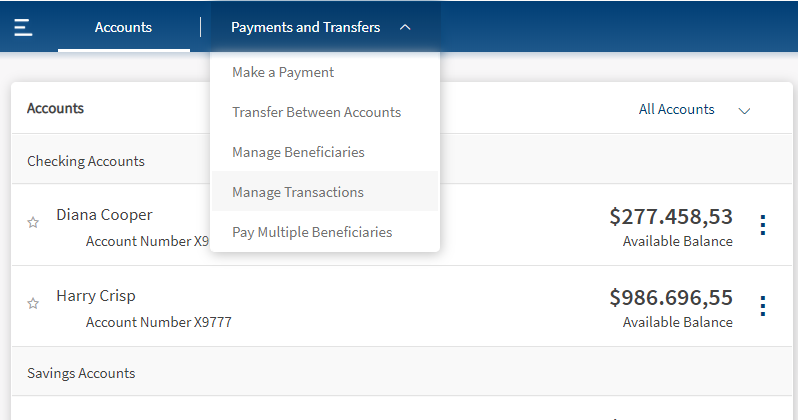
Menu path:
- OLB. On the top bar click Payments and Transfers > Make Payment. The Make Payment screen appears.
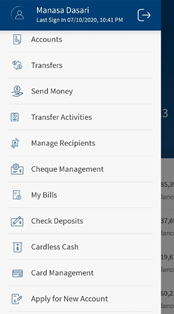
- MB. Hamburger menu > Send Money
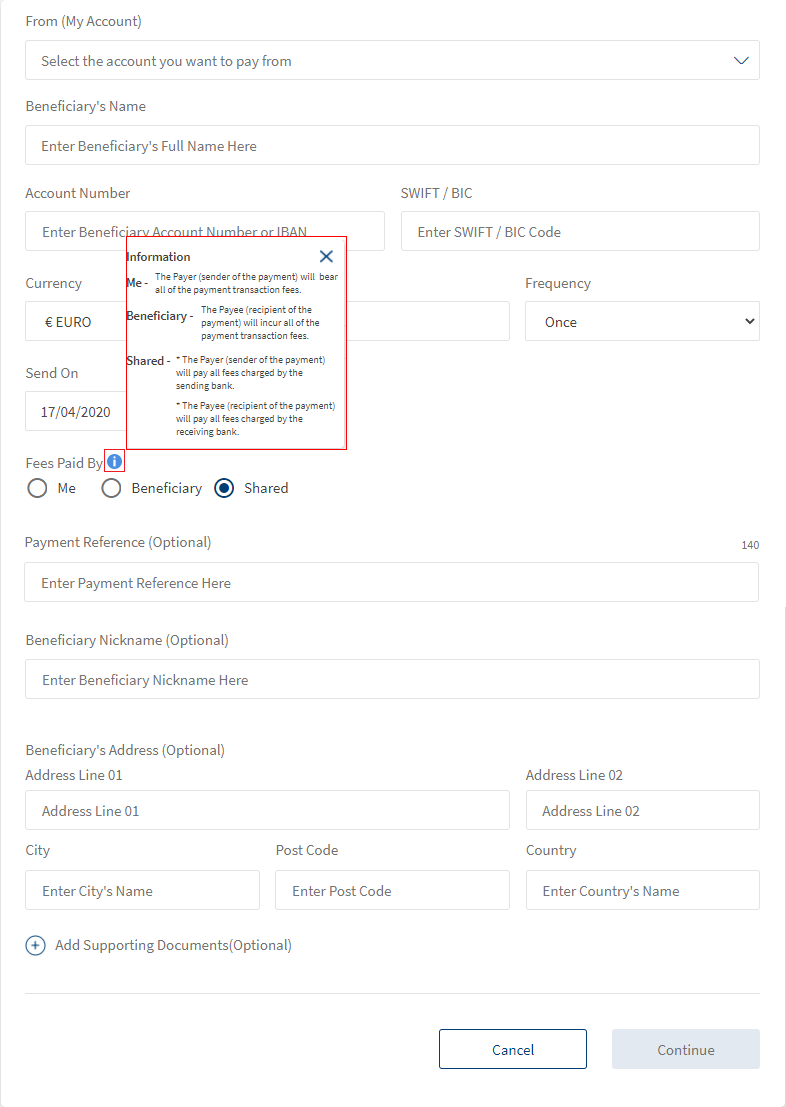
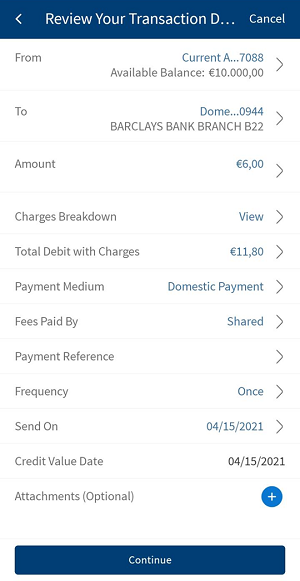
The Make Payment screen is displayed with a new payment template to initiate the payment. Enter the following details to initiate a payment.
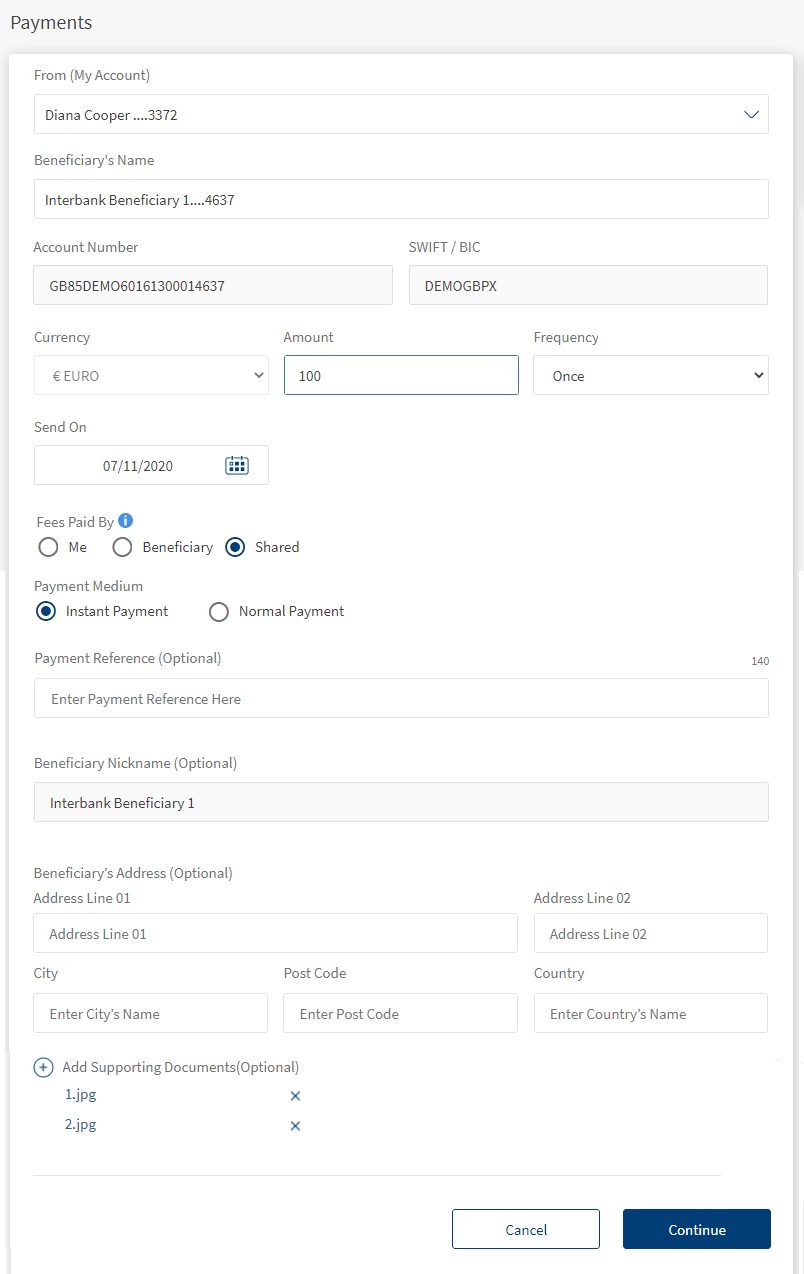
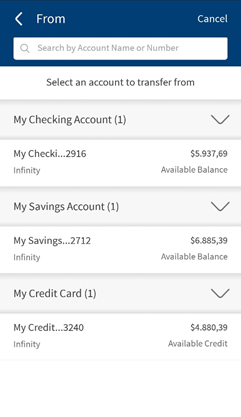
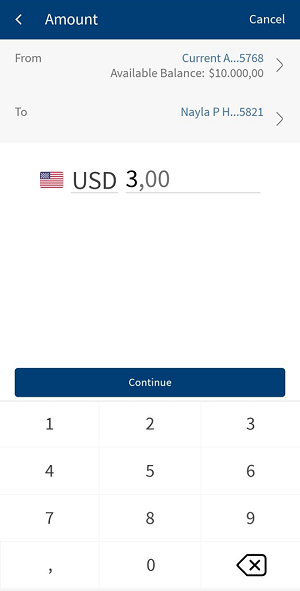
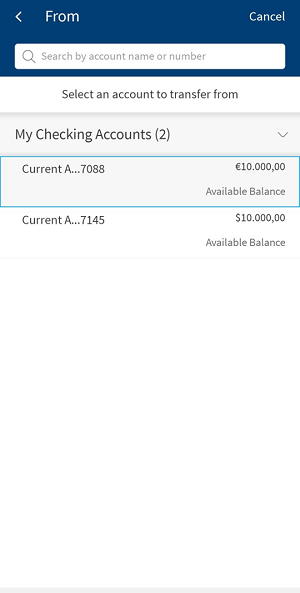
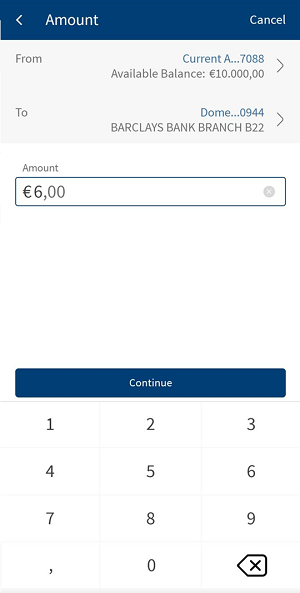
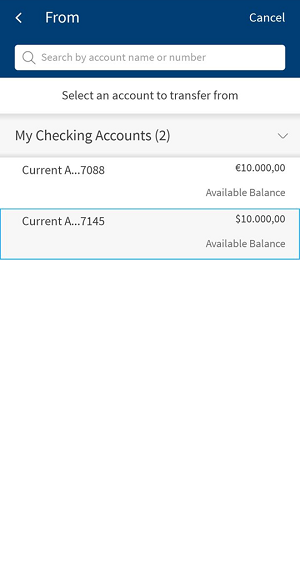
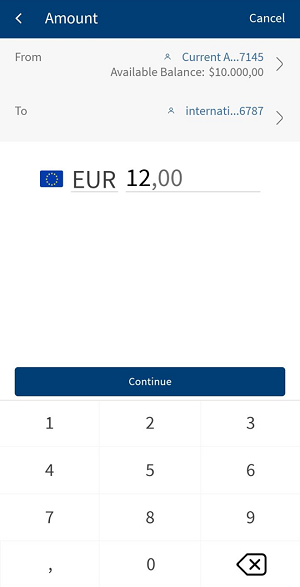
- From: You can view only the eligible Checking and Saving accounts displayed in this field. Select one of your accounts from the list. Based on the search, the respective accounts are displayed. You can search using the account name and number.
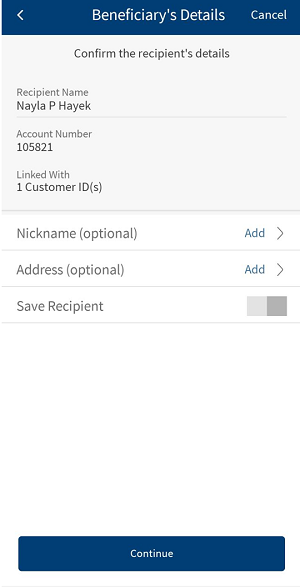
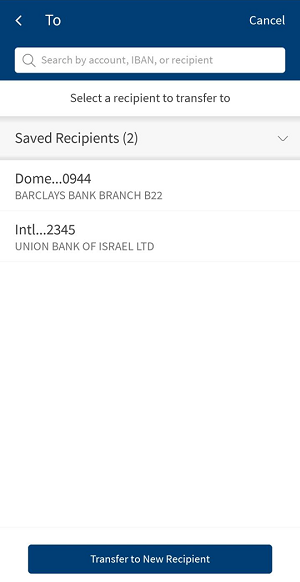
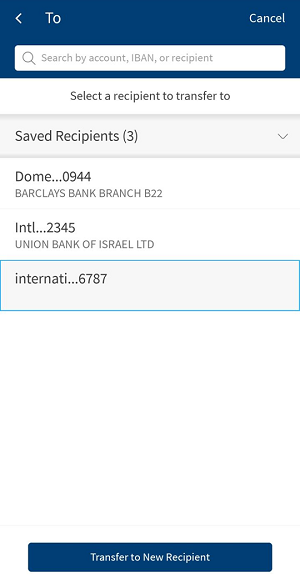
- To. This field is applicable only when your are performing a transaction for the saved beneficiary from your mobile banking application.
- For Payment. The last three used payee details are displayed in recent group and the remaining beneficiary details are displayed in alphabetical order in saved beneficiaries group in To account screen. You can search for the payee details through account, IBAN, or beneficiary name.
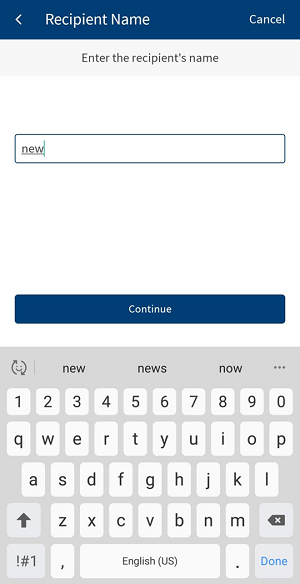
- Transfer to New Recipient. You can transfer the amount to a new recipient who is not in saved beneficiaries list.
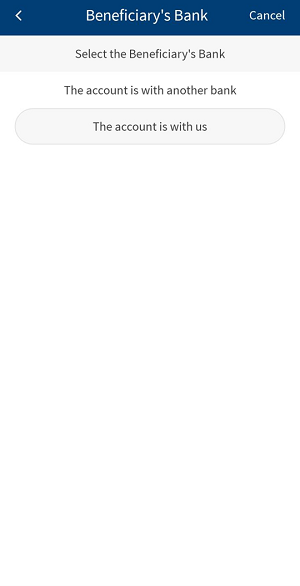
- Beneficiary's Bank. Select the beneficiary's bank. The available options are:
- The account is with another bank
- The account is with us
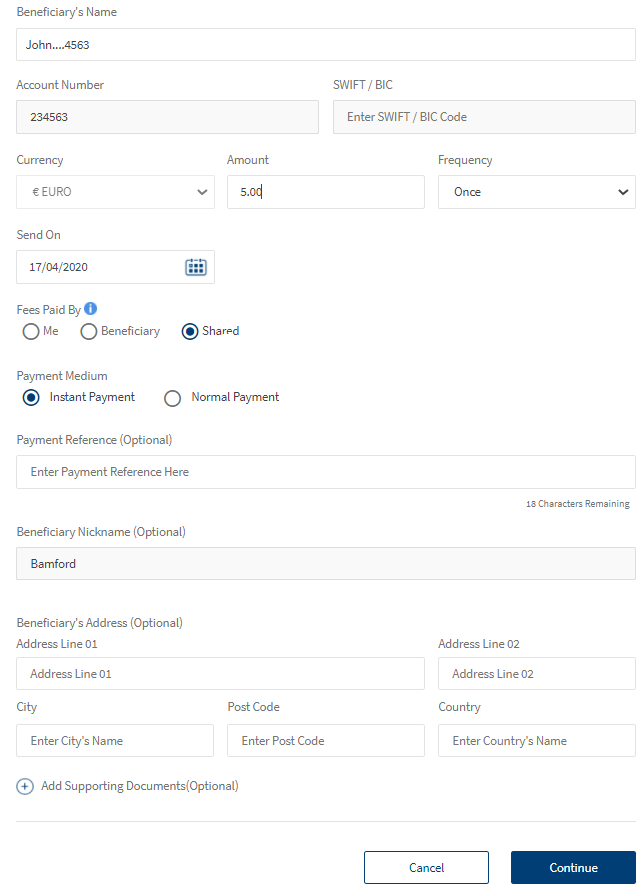
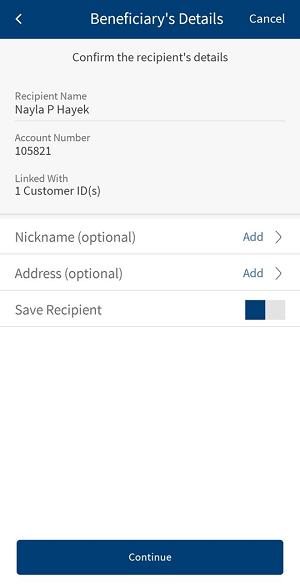
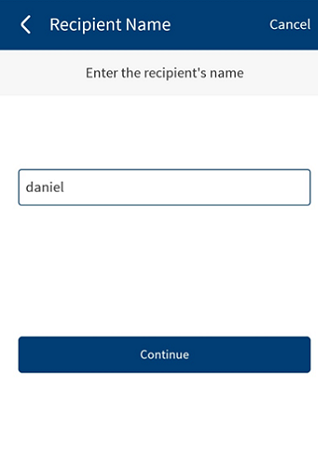
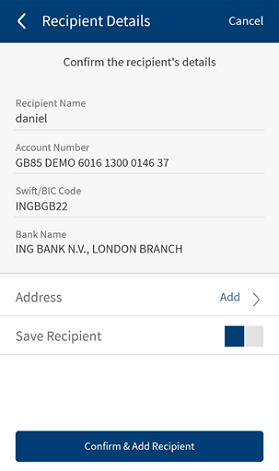
- Beneficiary Name: Enter the name of the beneficiary.
- Beneficiary Bank: Select Same bank if the beneficiary also has the account in the same bank. If the customer has an account in the external bank, select Other bank.
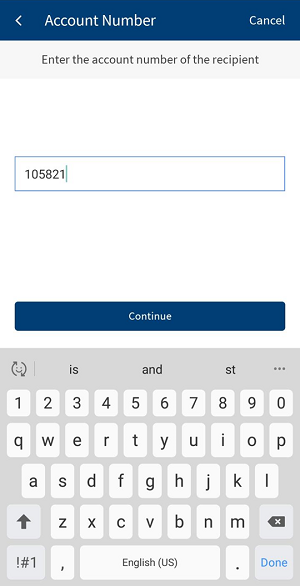
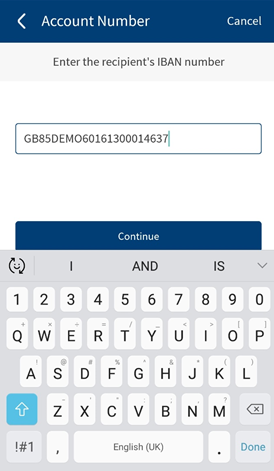
- Account Number/IBAN: Enter the beneficiary's account number. If you select same bank, enter the account number. If you select other bank, then you must enter the account number or IBAN.
- Account number must be alphanumeric characters and you can enter up to 34 characters.
- If the account number is IBAN, then the account number must with the below validations:
- Country Code (A-Z): two letter code
- Control Code (0-9): two number code
- Remaining: up to 30 letters and numbers which outlines the domestic bank and account number.
- SWIFT/BIC: If the provided account number is part of cross border or international payment, then you must enter the SWIFT/BIC number that contains alphanumeric characters. SWIFT/BIC field does have a format and structure validations.
BIC must either 8 or 11 characters only.
- Bank code (A-Z): 4 letter code
- Country code (A-Z): 2 letter code
- Location Code (0-9 or A-Z): 2 digit code – either letters or numbers
- Branch Code (0-9 or A-Z): optional 3 digit code – either letters or numbers
- Click on Look Up to automatically detect the SWIFT/BIC. Clicking on Look Up will display a pop up with the privilege to search the SWIFT/BIC details. Search by providing the following details to pick the right SWIFT/BIC:
- Bank Name
- Country
- City
By default, SWIFT/BIC is enabled only in terms of international payment. For domestic/same bank payments, it will be disabled by default. For domestic payments, provide the IBAN details that will have the capabilities to get the BIC and bank name/address details.
- Currency. Select the currency from the Currency list. The Currency list displays the currency code with symbol. Based on the payment, this field is enabled.
- For international/cross border payment, it unlocks the currency option.
- For the same bank transfer if the 'From account' currency and 'To account' currency is different, both the currencies are displayed while performing a transfer. You can select the currency type from the displayed options.
- If the From and To account currencies are the same, then the currency of that account is displayed by default.
- For European/Domestic payment, only EUR currency is locked.
- For Transfer, From account currency is locked.
- For international/cross border payment, it unlocks the currency option.
- Amount. Enter the amount.
- Frequency. Specify the payment frequency details. The following options are available:
- Once
- Daily
- Weekly
- Every two weeks
- Monthly
- Quarterly
- Every six months
- Annually
By default, the app selects the frequency as once and the current date. You can change the frequency and the date if the transfer is a scheduled or a recurring payment.
- Send On. Enter the send on date of payment/transfer details. By default, the app displays the current date. For future dated/recurring payment/transfer, you can schedule the future date.
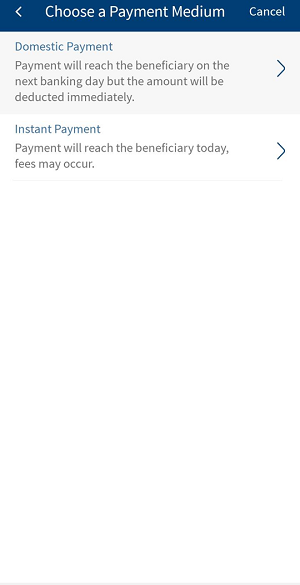
- Payment Medium. For domestic payments, you can choose between Normal payment and Instant payment. If you select,
- Normal payment (the time taken for the payment transfer to reach the beneficiary would be 1 day to 3 days, based on the bank. But there are no additional charges
- Instant payment (Urgent payment and it incur additional charges).
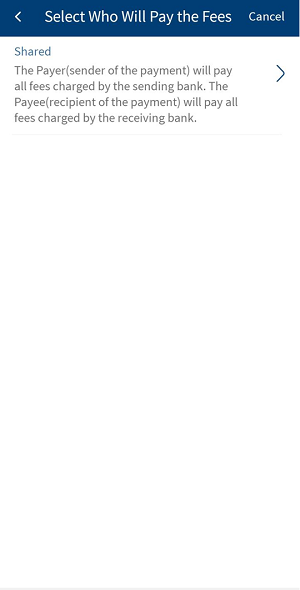
- Fees paid by. Select the who will pay the charges in Fees paid by field. The available options are:
- Me - The Payer (sender of the payment) will bear the payment transaction fees. The beneficiary will receive the full amount of the payment.
- Beneficiary - The Payee (recipient of the payment) will incur the payment transaction fees. In this scenario, the payee will receive the payment excluding the transfer charges.
- Shared - The Payer (sender of the payment) will pay all fees charged by the sending bank. The Payee (recipient of the payment) will pay all fees charged by the receiving bank. The beneficiary will receive the payment excluding the charges.
- For international payments, there is no default option. It is mandatory for the user to select out of the three options.
For domestic payment, Both is selected by default and disabled. User cannot make a choice in terms of domestic payment.
This field not applicable for same bank payment.
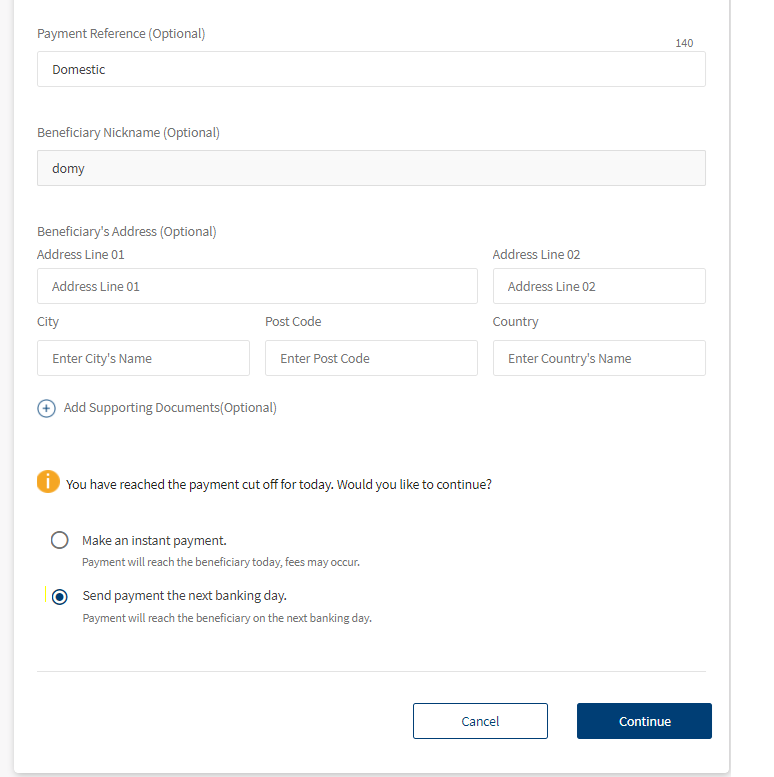
- Payment Reference Details. Enter the Payment Reference details. You can enter up to 140 alphanumeric characters with few allowed special characters for all types of payment transfers.NOTE:
- You cannot enter more than 140 alphanumeric characters and the count shows zero after which, you will not be allowed to input further.
- Only the following special characters are allowed by SWIFT / ? . () : +
- Beneficiary Nickname. Enter the beneficiary nickname. You can enter alphanumeric characters and up to 35 characters.
- Beneficiary's Address. Enter the beneficiary's address that includes Address Line 01, Address Line 02, City, Post Code, and Country.
- Add Attachments. You can add an attachment for future reference. To add an attachment, follow these steps:
- Click + icon and select the file to add as an attachment.
The attached file is displayed along with the Cancel (X) option.
- Click Cancel (X) to remove the attachment. A pop-up is displayed asking for confirmation.
- Click Yes to confirm. The attachment will be removed.
NOTE: You can attach up to five PDF/JPEG files only. Adding an attachment is mandatory based on the payment/transfer amount. The threshold amount is configured by the bank.
Error Scenarios. In the following scenarios the error messages are displayed.
- If you try uploading an invalid file format (PNG, TXT, CSV).
- If you try uploading a file more than the allowed size (i.e. 5MB).
- If you try uploading files more than the allowed file limit (max. five files).
- Click + icon and select the file to add as an attachment.
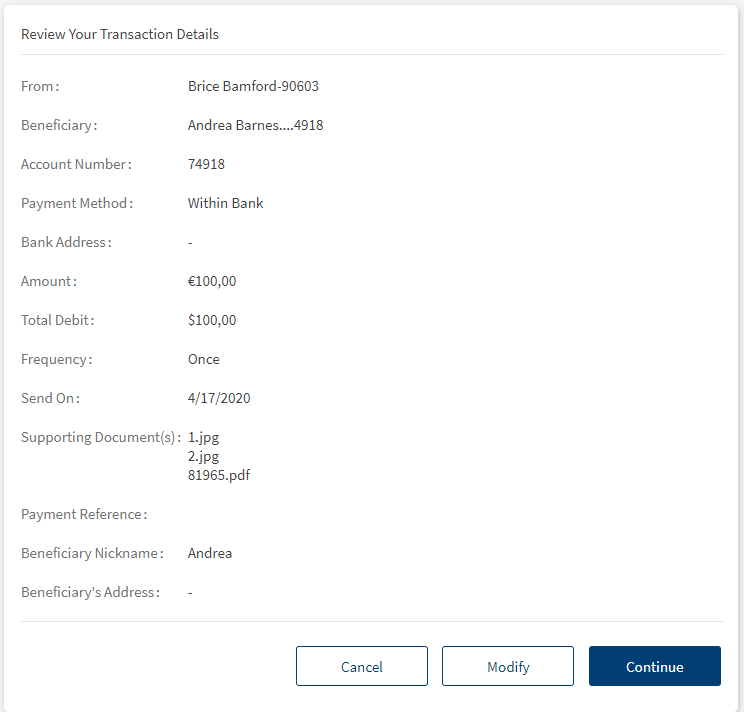
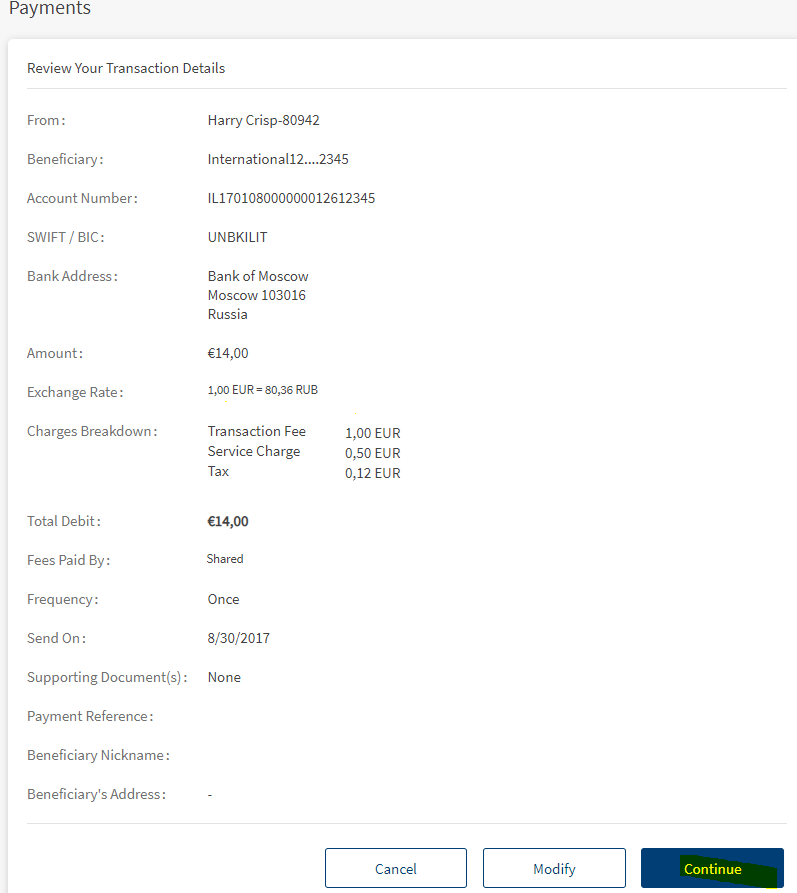
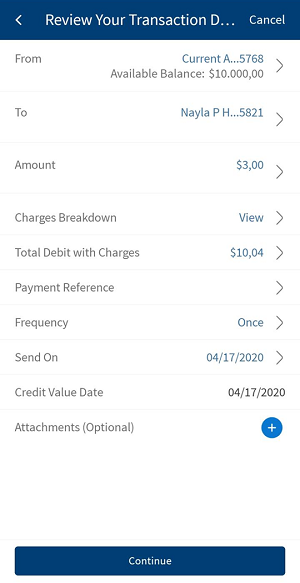
- Click Continue to proceed with the payment. The Confirmation screen appears.
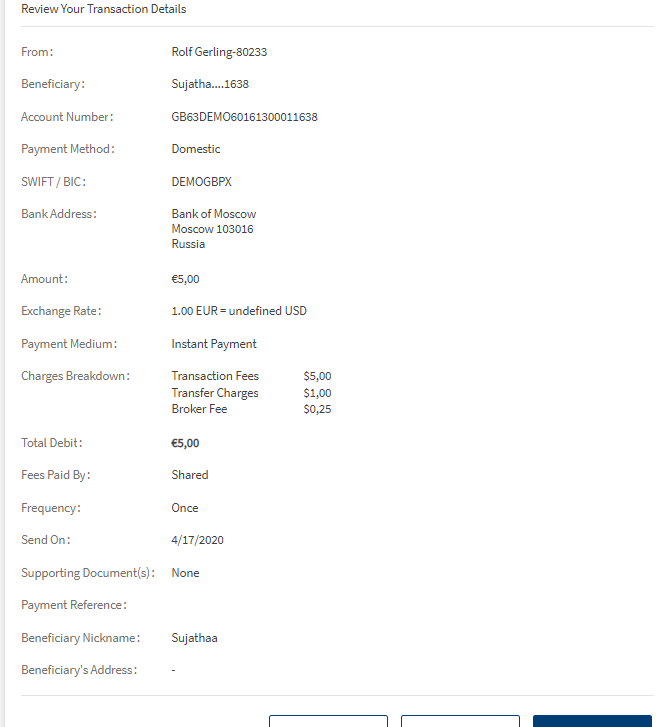
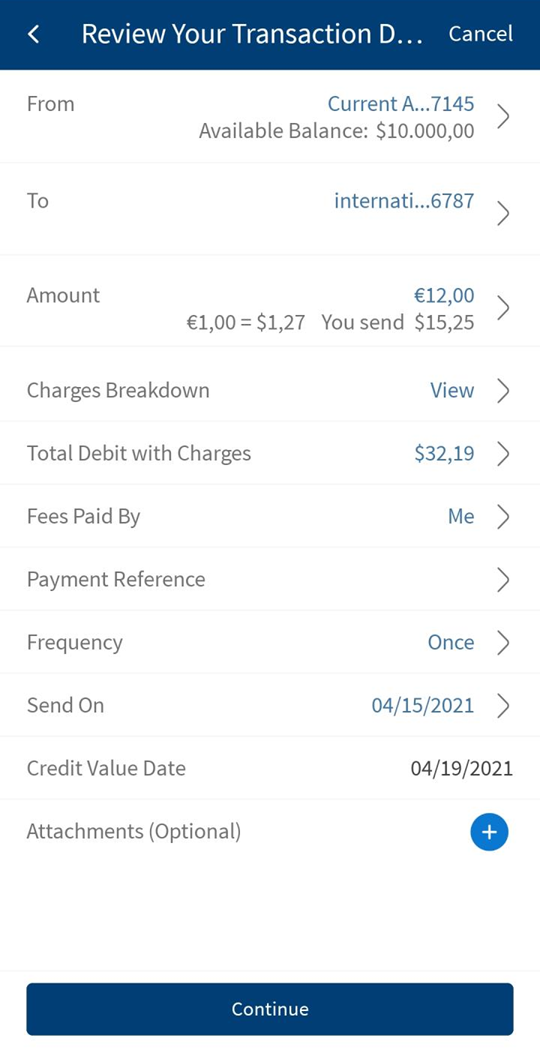
- The confirmation screen displays with the following details:
- From account (the account number is masked except the last four digits)
- Beneficiary name
- Beneficiary account number (the account number is masked except the last four digits)
- Payment Method (International/Domestic/Eurobank Internal)
- SWIFT/BIC (if applicable)
- Bank address with bank name (displays if available)
- Amount
- Exchange rate (if applicable)
- Charges breakdown (with From account currency)
- Transaction Fee
- Service charge
- Tax
- Total debit amount
- Fees paid by (displays if available)
- Frequency
- Send on date
- Credit value date
- Supporting documents (displays if available)
- Payment reference/notes
- Beneficiary nickname
- Beneficiary address
- You can perform the following actions in the Confirmation screen.
- Click Continue to proceed with the payment.
- Click Modify to edit the details.
- Click Cancel to cancel the transaction.
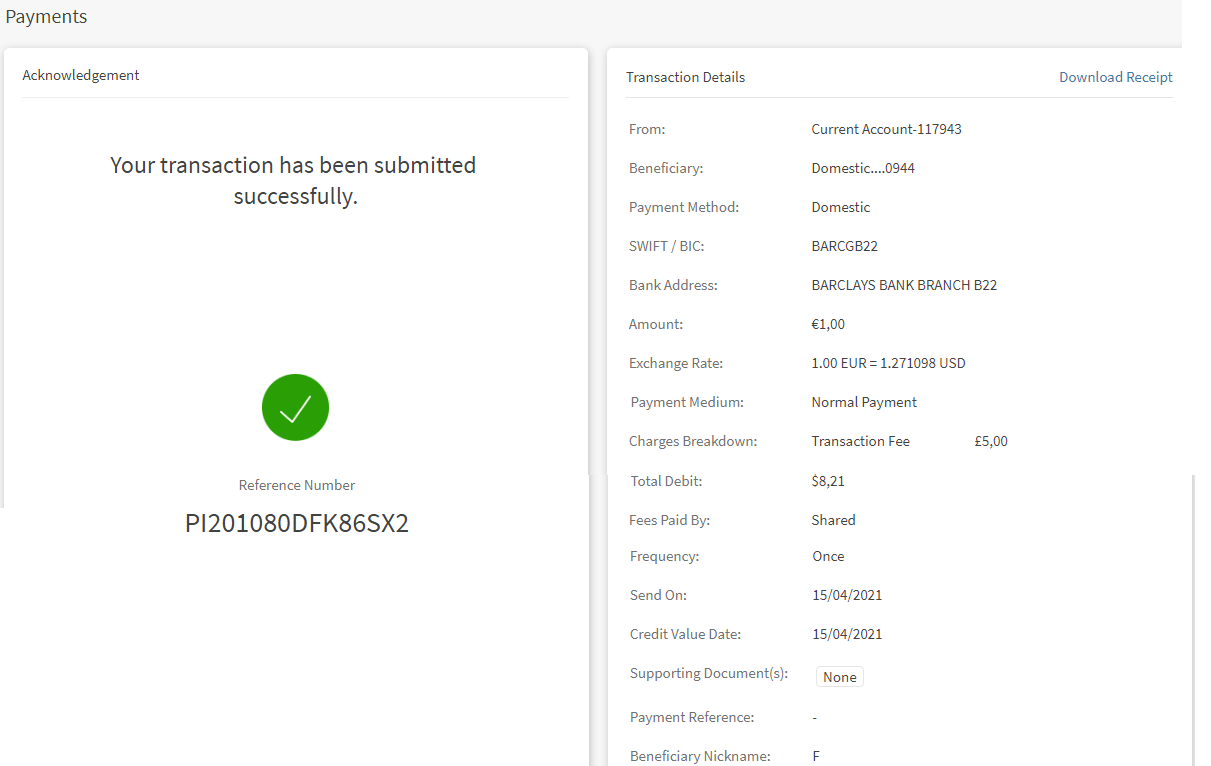
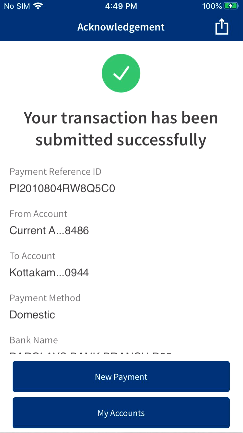
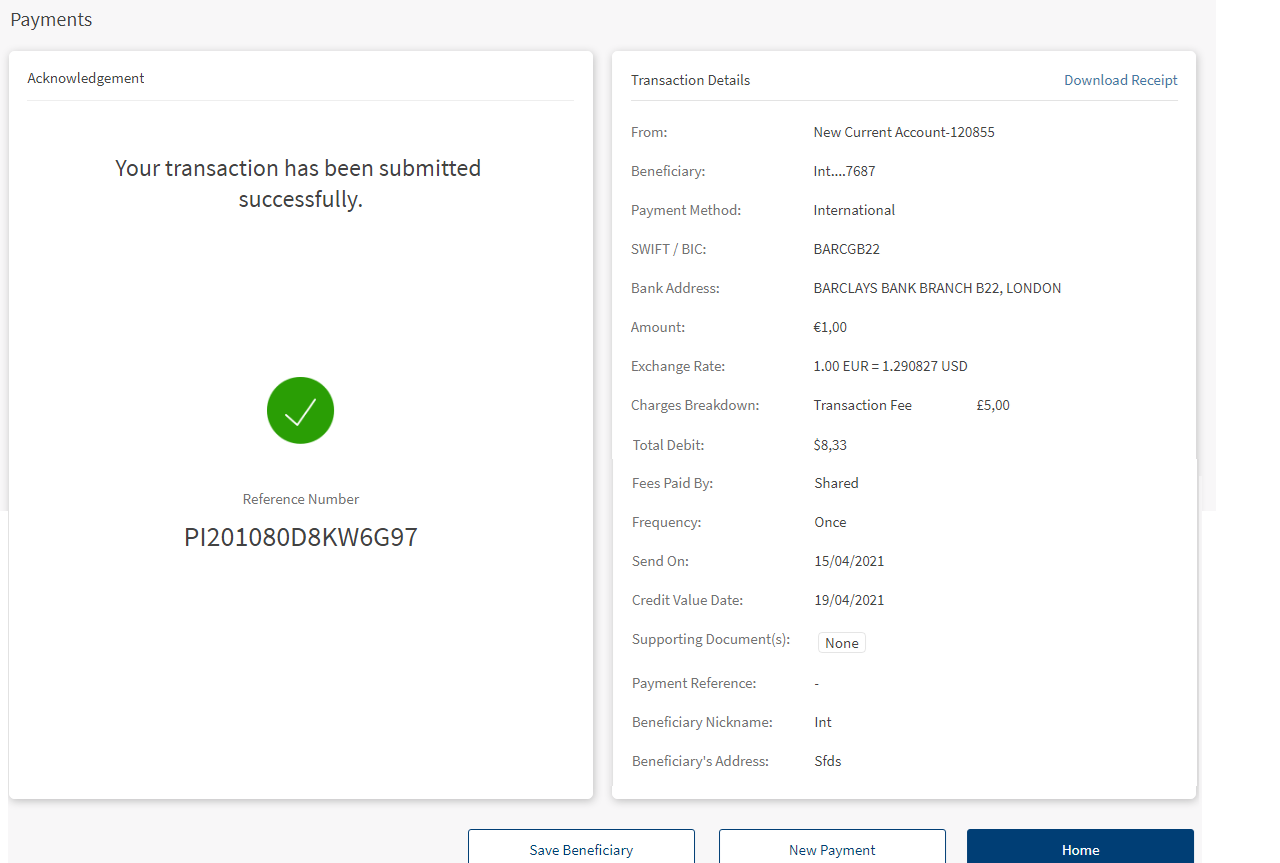
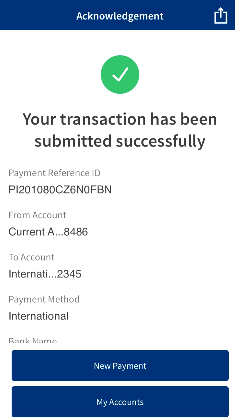
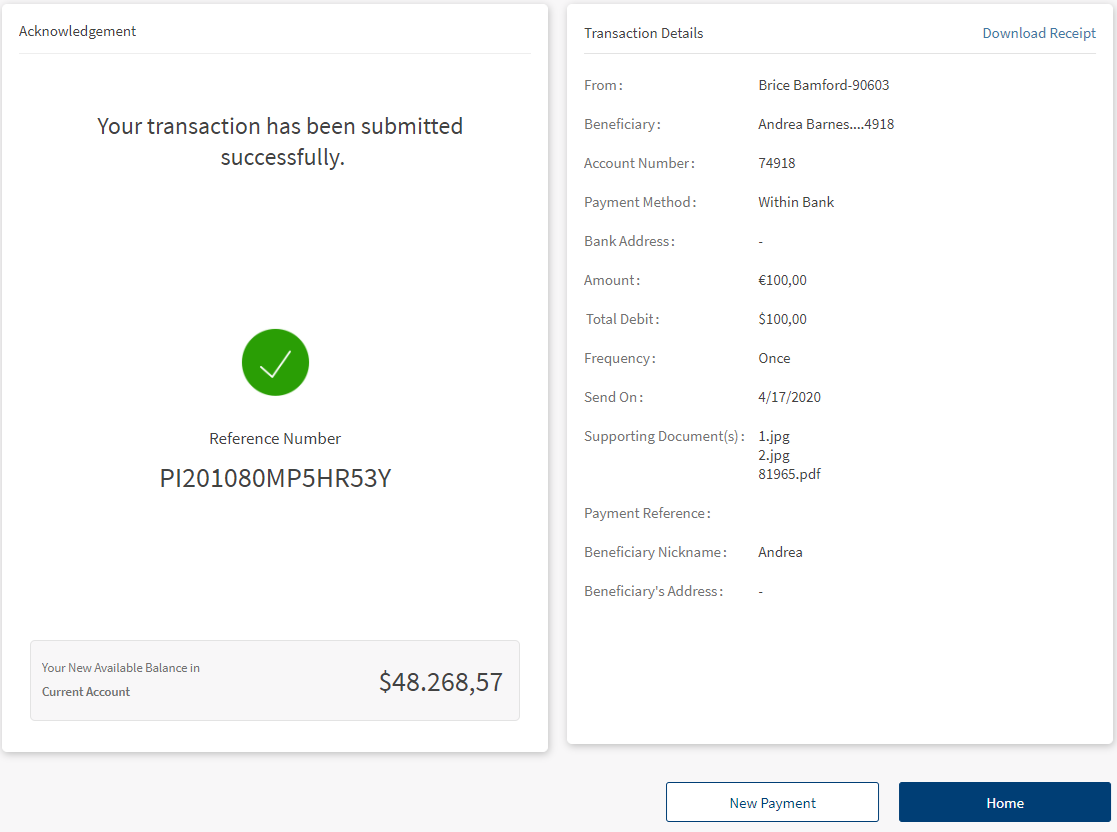
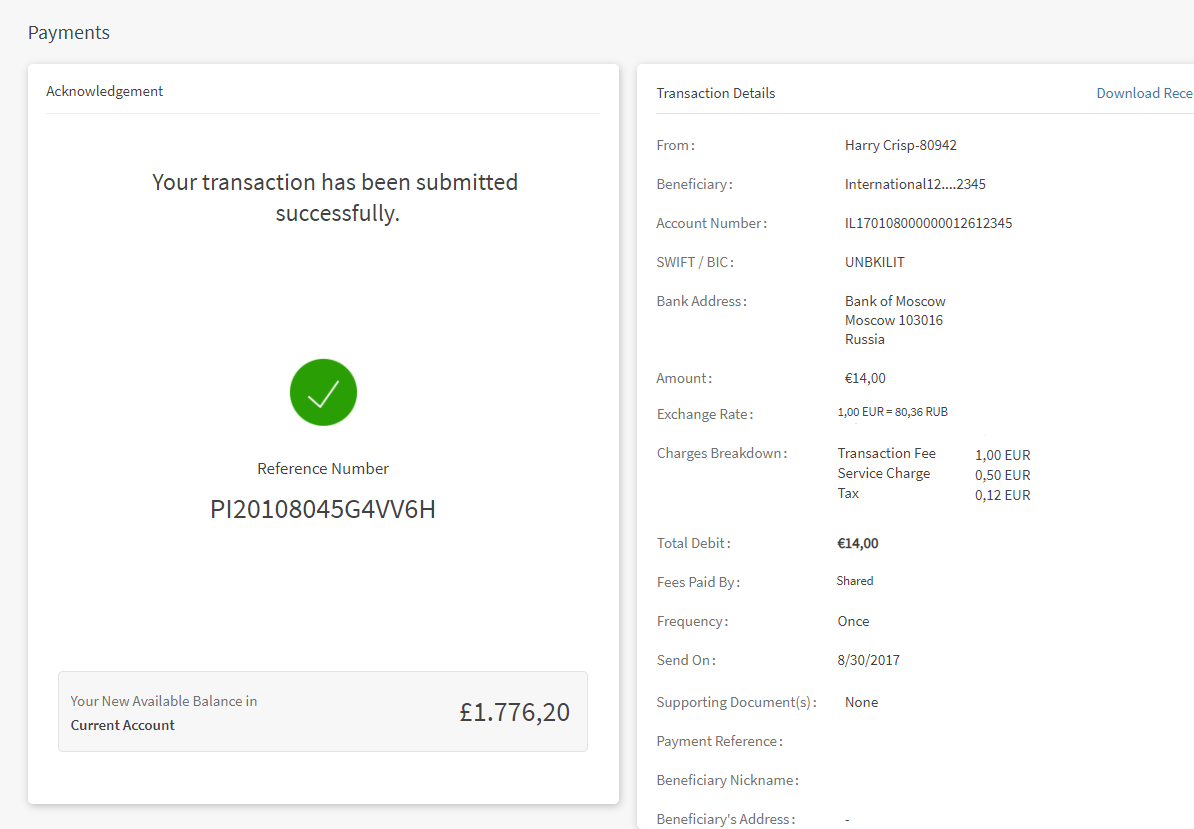
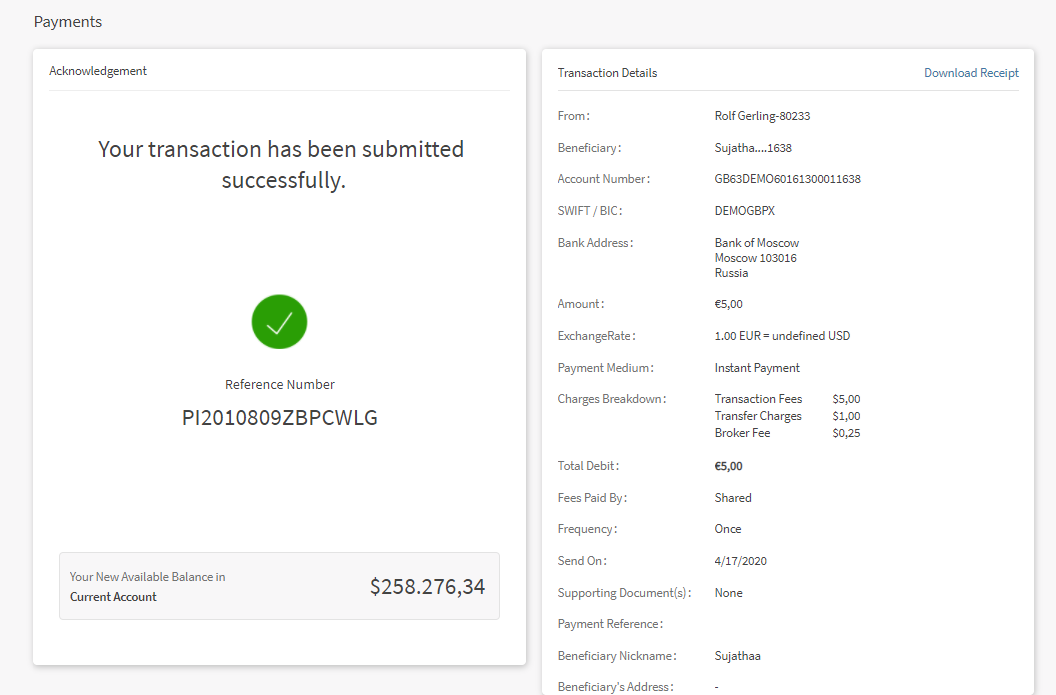
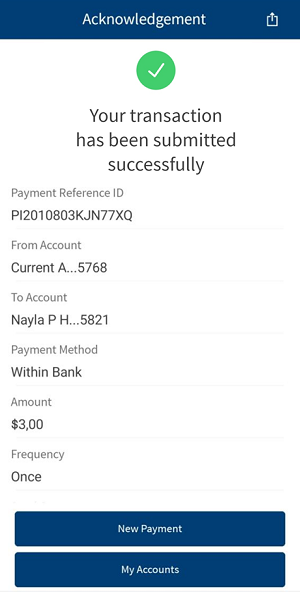
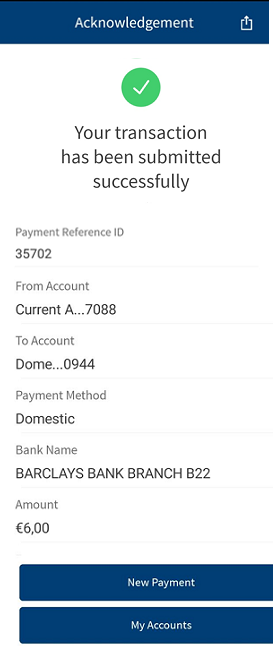
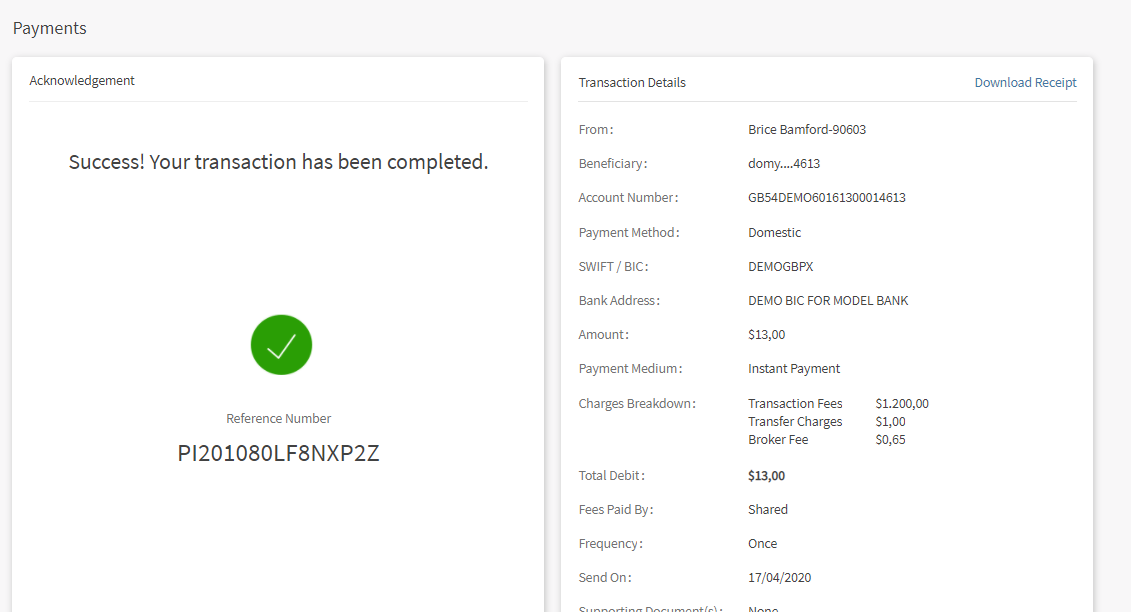
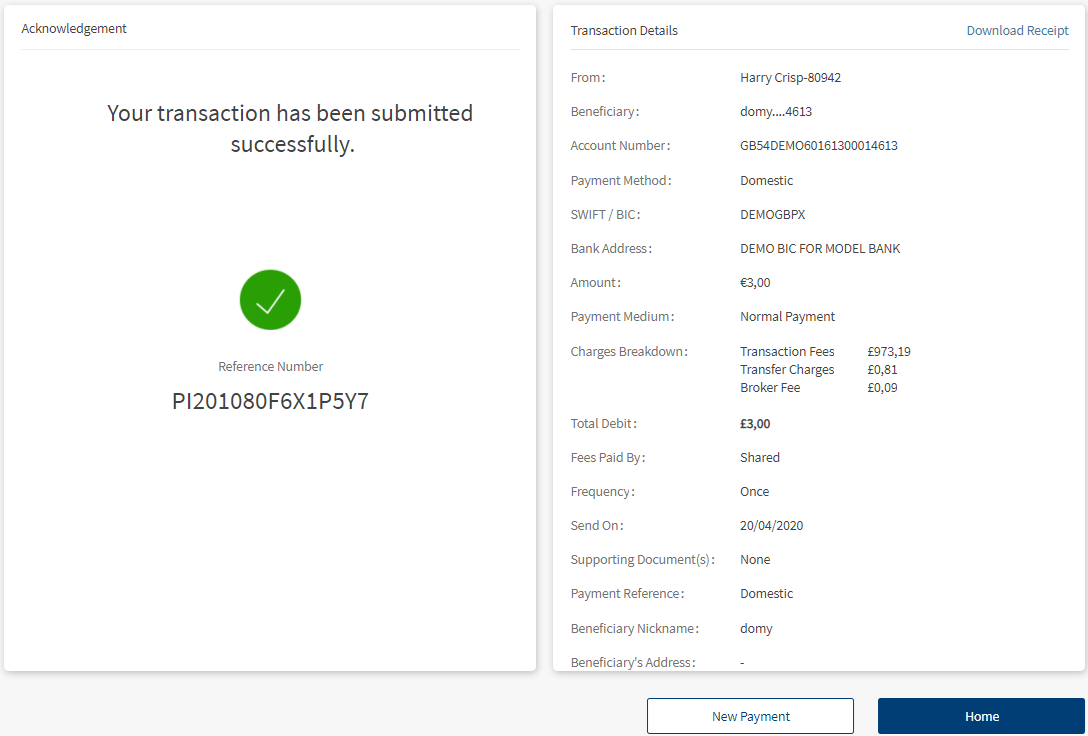
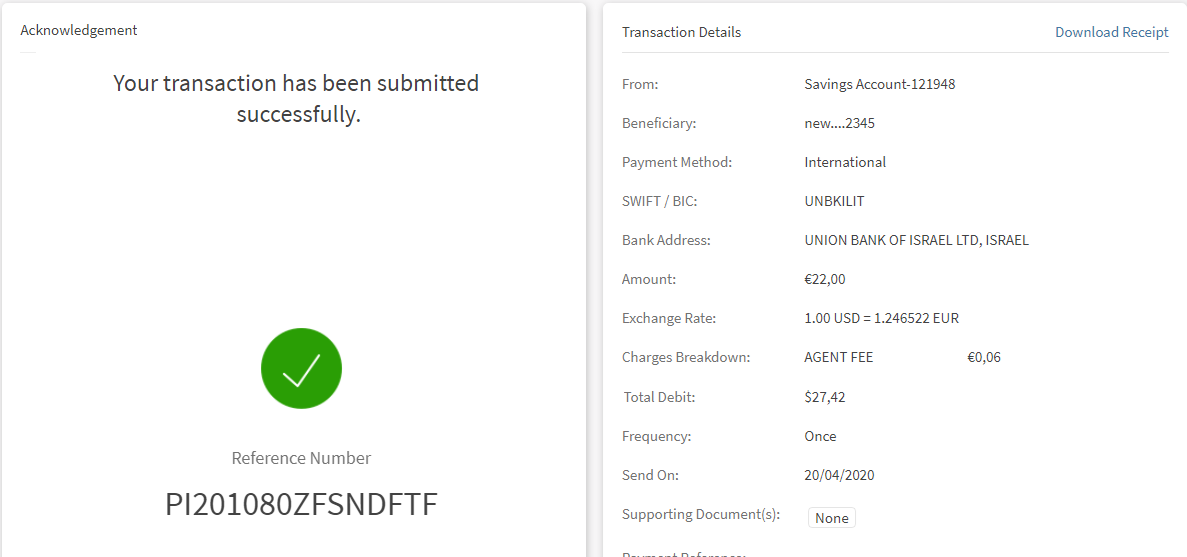
- Click Continue. The Acknowledgment screen appears.
The Acknowledgment screen displays a payment unique reference ID and the payment details. You can perform the following actions in this screen:
- Save Beneficiary (applies only for new beneficiaries)
- New Payment
- Home
You can initiate a one-payment for the new beneficiary and save the beneficiary details.
On Transfer Acknowledgment screen, the message is updated as "Your transaction has been submitted successfully". This message is displayed only in the case of the current dated, single transfer and does not apply to the below cases:
- A future dated, single transfer
- A current dated, single transfer that requires approval by other Infinity users
- A future dated, single transfer that requires approval by other Infinity users
- A standing order (recurring transfer)
- A standing order (recurring transfer) that requires approval by other Infinity users
Within Bank
![]()
![]()
Domestic payment
One time International Payment
For Within Bank
International Payment
Domestic Payment
Mobile Screens
Within same bank payment

For Domestic Payment
For International Payments

SEPA Payment after Cut Off Time
Scenario 1
Upon clicking Continue to proceed with the payment, if the payment breaches the cut off time, a warning message is displayed with two options:
- Make an Instant Payment
- Send payment the next banking day
Make an Instant Payment
Select this option to instantly pay the beneficiary but it incurs few additional charges. Upon selecting this option, the payment gets initiated and the amount is credited to the beneficiary account on the same day.
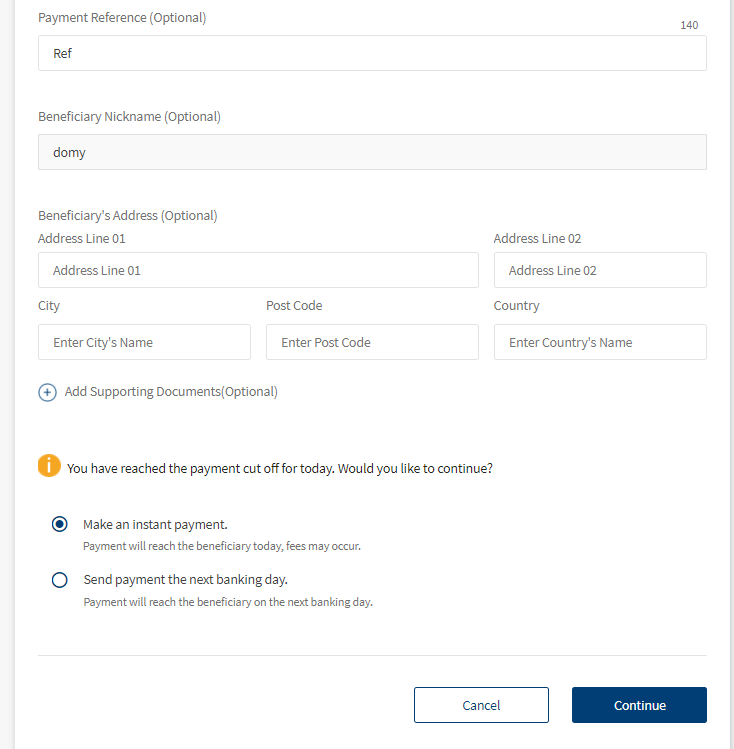
Send Payment on Next Banking Day
Select this option to transfer the funds to beneficiary on the next business day. Upon selecting this option, the payment gets initiated and the amount is debited from the recipient account and will be credited to the beneficiary account on the next business day.
Scenario 2
Upon clicking Continue to proceed with the payment, if the payment breaches the cut off time, a warning message is displayed with an option to send the payment on next business day.
Click Ok to continue with the payment.
Click Cancel to payment.
Download/Share Payment Reference Template
You can share or download the payment reference template to a receiver or sender for reference. For better understanding to the receiver, the payment reference template must have the remittance information. You can share the reference template through SMS/WhatsApp/Email/Local drive.
The payment reference template displays the following details:
- Payment reference ID
- From account (the account number is masked except the last four digits)
- Beneficiary name
- Beneficiary account number (the account number is masked except the last four digits)
- Payment Method (International, Domestic, or Eurobank Internal)
- SWIFT/BIC (if applicable)
- Bank address with bank name (displays if available)
- Amount
- Exchange rate (if applicable)
- Charges breakdown (with From account currency)
- Transaction Fee
- Service Charge
- Tax
- Total debit amount
- Fees paid by (displays if available)
- Frequency
- Send on date
- Credit value date
- Supporting documents (displays if available)
- Payment reference/notes
- Beneficiary nickname
- Beneficiary address
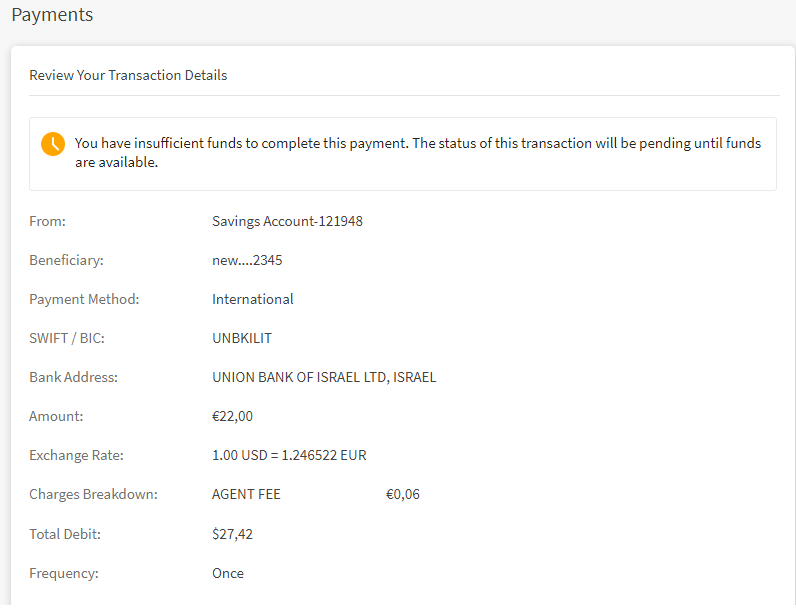
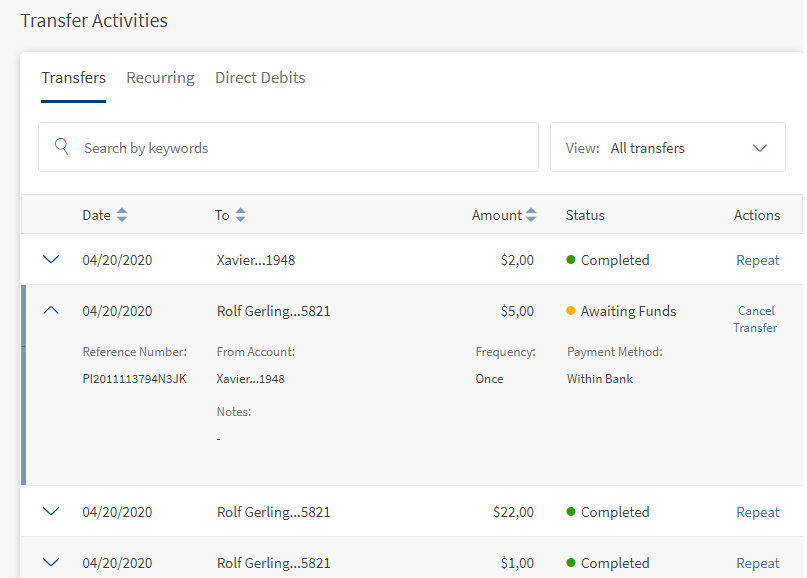
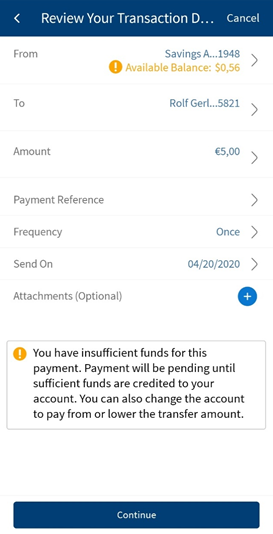
Transfer with Insufficient Funds
You can initiate a transfer with insufficient funds. While performing the transfer, an alert is displayed and the you (customer) must accept to proceed with the transfer. Once the transfer is done, the acknowledgment screen displays the reference number.
The Transfer Activities screen displays the status for the transaction performed with insufficient funds as 'Awaiting Funds'.
Responsive Web
Mobile Screens

Transact Integration
A transfer that is performed with insufficient funds in Infinity is submitted to Transact. In Transact PO, the status of such transaction is 'Awaiting Funds'.
APIs
The following APIs are used in this feature.
| Verb | Exp API | IRIS API | Method |
|---|---|---|---|
| getSameBankAccount | services/data/v1/RBObjects/operations/ExternalAccounts/getSameBankAccount | {Base_URL}/api/v1.0.0/party/customers/{customerID}/beneficiaries | GET |
| getDomesticAccount | services/data/v1/RBObjects/operations/ExternalAccounts/getDomesticAccount | {Base_URL}/api/v1.0.0/party/customers/{customerID}/beneficiaries | GET |
| getAllInternationalExternalAccounts | services/data/v1/RBObjects/operations/ExternalAccounts/getAllInternationalExternalAccounts | {Base_URL}/api/v1.0.0/party/customers/{customerID}/beneficiaries | GET |
| getOtherBankAccount | services/data/v1/RBObjects/operations/ExternalAccounts/getOtherBankAccount | {Base_URL}/api/v1.0.0/party/customers/{customerID}/beneficiaries | GET |
| get list of external accounts | services/data/v1/RBObjects/objects/ExternalAccounts | {Base_URL}/api/v1.0.0/party/customers/{customerID}/beneficiaries | GET |
| getAllExternalAccountsWithPagination | services/data/v1/RBObjects/operations/ExternalAccounts/getAllExternalAccountsWithPagination | {Base_URL}/api/v1.0.0/party/customers/{customerID}/beneficiaries | GET |
| editExternalAccount | services/data/v1/RBObjects/operations/ExternalAccounts/editExternalAccount | {Base_URL}/api/v1.0.0/party/beneficiaries/{beneficiaryID} | PUT |
| deleteExternalAccount | services/data/v1/RBObjects/operations/ExternalAccounts/deleteExternalAccount | {Base_URL}/api/v1.0.0/party/beneficiaries/{beneficiaryID} | DELETE |
In this topic
