Posting Transact Messages Directly to the Queue
When you design a flow, you have the option in Event Designer to Post Directly to Queue. Selecting this option allows the Integration Framework to write the business message as a Raw Integration Framework Message to a queue instead of writing to IF.EVENTS.INTERFACE.TABLE, while the transaction is being processed.
When a transaction is initiated, the raw Transact message is written to the queue. A raw to XML transformer reads the raw message in the input queue and writes the transformed message to the output queue. This transformer capability is provided through a standalone component. If an error occurs, the original raw format message, along with the exception stack, is saved in the error queue.
We recommend using this option for strict time-bound operations where you need to pass Transact messages instantly. This solution provides very low latency.

Configuring the Queue Name

You need to configure the queue name with the same value provided in the IF.INTEGRATION.SERVICE.PARAMETER table > DESTINATION.STATIC field
<queueName>#<queueConnectionFactory>.
The queue connection factory is optional, if the queuing system is in the same system. Once you have entered the queue name in the text box, the attribute Raw Xml is selected by default and is no longer editable.
<session>
		<description>TAFJ BROWSER Bean</description>
		<display-name>TAFJ BROWSER Bean</display-name>
		<ejb-name>BROWSERProcessingBean</ejb-name>
		<resource-ref>
			<description>Used to get connections to JMS for OFS queues</description>
			<res-ref-name>jms/TAFJQueueConnectionFactory</res-ref-name>
			<res-type>javax.jms.ConnectionFactory</res-type>
			<res-auth>Container</res-auth>
		</resource-ref>
</session>
Installing the Raw to XML Transformer Component
Follow the steps below to install raw to XML transformer component.
Unzip the distribution archive into a dedicated folder. You will find the following artefacts:
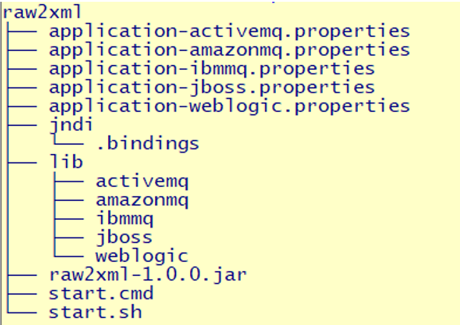
The component includes:
- Specific application.properties and jar files for the following five JMS providers: JBoss, ActiveMQ, AmazonMQ, IBM MQ and WebLogic.
- A .bindings file in the jndi folder, which is used when connecting to IBM MQ. There are two scripts used to launch the application, one for Linux OS and one for Windows.
Configuring the Raw to XML Transformer Component
To start the component for a particular provider, you need to adapt the corresponding application.properties file to suit your configuration. For example, the JBoss application.properties file is delivered with the following default content:
Initial.context.factory=org.wildlfy.naming.client.WildFlyInitialContextFactory
provider.url=http-remoting://localhost:8080
security.principal=jms
security.credentials=Temenos123$
connection.factory=jms/RemoteConnectionFactory
Starting the Raw to XML Transformer Component
Follow the steps below to start the raw to XML transform component.
- Change directory to the component's folder.
- Run the start.sh or start.cmd script (depending on the OS).
This is the usage of the start.sh script.
> ./start.sh –h
Usage : start.sh [ -p provider ] [ -i inQueue ] [ -o outQueue ] [ -e errQueue ]
All the parameters are optional, here are the default values:
jms provider: jboss
input queue:  inQueue
error queue: inQueue_err
output queue: inQueue_out
For example, to run the component for activemq provider with an input queue named amqIn, you should run:
> .start.sh –p activemq –i amqIn
Checking the Parameters Used by the Component
You can find out which parameters are used by the component by checking the first line of output at the console (the line that starts with Running:).
> ./start.sh
Running : /mnt/o/dvp/java/jdk8-64/jre/bin/java.exe –DINQUEUE=
inQueue –DOUTQUEUE=inQueue_out –DERRQUEUE=inQueue_err
-Dspring.profiles.active=jboss –Dloader.path=lib/jboss/ -jar raw2xml-1.0.0.jar
Stopping the Raw to XML Transformer Component
To stop the raw to XML transformer component, enter Ctrl-C in the execution terminal.
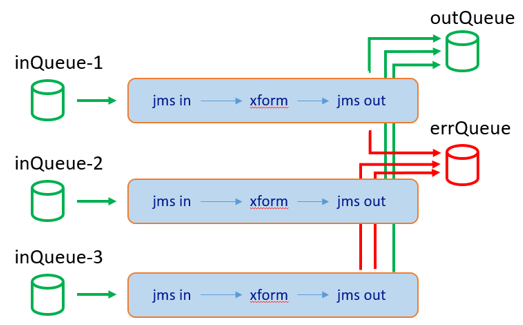
Deploying Multiple Instances of the Raw to XML Transformer Component
If there are many input queues (defined by event type, for example), then you need to deploy multiple instances of the raw to XML transformer component, as shown below. Each instance is deployed in its own folder and configured accordingly through the application.properties file.
Logging
Each execution of the component, in addition to the terminal from which it was launched, logs its output to a log file. The log files are created under the folder log and have the following syntax:
console_provider_inQueueName_pid.log
In this topic
