Configuring TAFJ and WebSphere DataSource
This section shows the steps required in configuring TAFJ and WebSphere Data source.
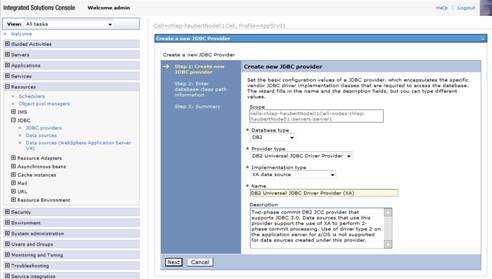
Creating a JDBC Provider
Procedure
- Click Resources > JDBC > JDBC providers > New.
- Specify the following properties:
- DatabaseType: DB2
- ProviderType: DB2 Universal JDBC Driver Provider
- Implementation type: XA data source
- Name: DB2 Universal JDBC Driver Provider
- Click Next.
- Enter the directory path for the db2jcc.jar and db2jcc_license_cisuz.jar files. For example, /usr/lpp/db2/db2910_jdbc/classes
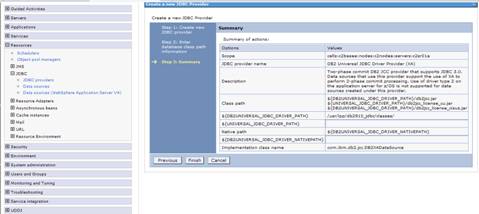
- Click Next and Finish.
- Save changes to master configuration.
- Set the user id and password in the tafj.properties file, which is located in %TAFJ_HOME%/conf under the keys temn.tafj.jdbc.username and temn.tafj.jdbc.password. For example,
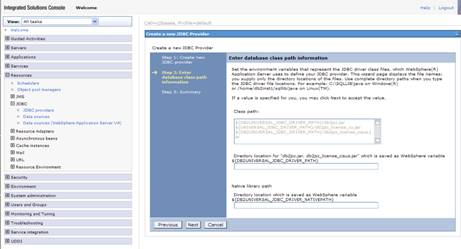
This will be saved as a WebSphere variable ${DB2UNIVERSAL_JDBC_DRIVER_PATH}.
Temn.tafj.jdbc.username            =             user1
Temn.tafj.jdbc.password             =             password
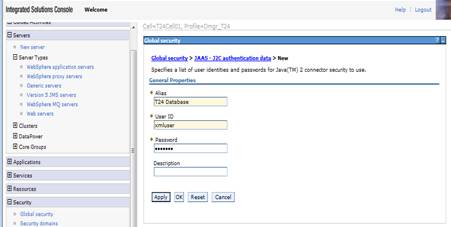
Creating the Temenos Transact Manager Database Credentials
Procedure
- Click Security > Global security > Java Authentication and Authorization Service > J2C authentication data > New.
- Specify the following properties:
- Alias: T24 Database
- User ID: username
- Password: your password

- Click OK and save changes to master configuration.
- Set the user id and the password in the tafj.properties file, which is located in %TAFJ_HOME%/conf under the keys temn.tafj.jdbc.username and temn.tafj.jdbc.password. For example,
temn.tafj.jdbc.username = *******
temn.tafj.jdbc.password = *******
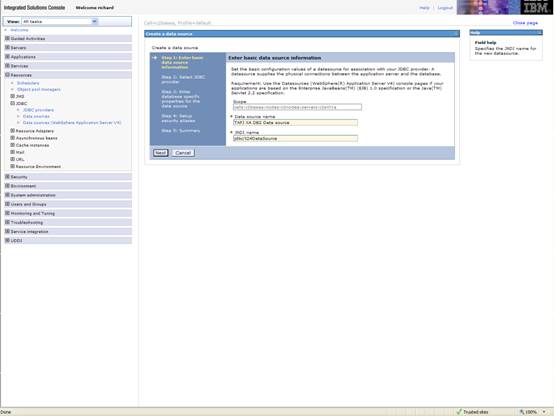
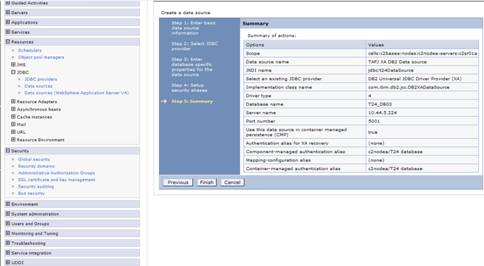
Creating a Data Source
Procedure
- Click Resources > JDBC > Data Source > Scope > Server > New.
- Specify the following properties:
- Data Source Name: TAFJ XA DB2 Data source
- JNDI Name: jdbc/t24DataSource

- Click Next.
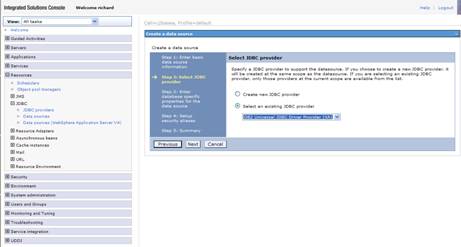
- Click Select an existing JDBC provider and select DB2 Universal JDBC Driver provider (XA).
- Click Next.
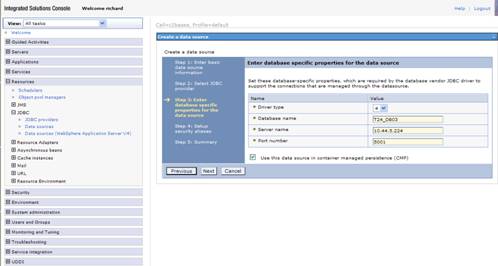
- Specify the following details:
- Driver type: 4
- Database name: The DB2 location name
- Server Name: The hostname or IP address of the DB2 server
- PortNumber: The DRDA port number for DB2
The DB2 location name can be found from the results of a DISPLAY DDF DB2 command:

- Set two variables in the tafj.properties file in %TAFJ_HOME%/conf under the keys temn.tafj.jdbc.url and temn.tafj.jdbc.driver. For example,
- Click Next.
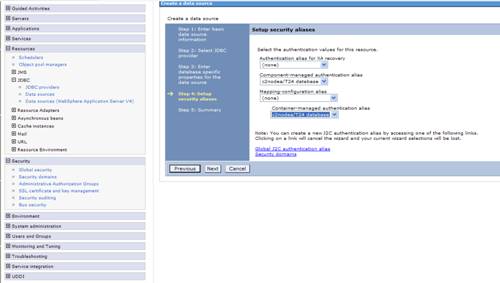
- In the Setup security alias section, select the authentication alias created before for XA recovery.
Component-managed authentication alias : T24 database
Container-managed authentication alias: T24 database
- Click Next.
- Click Finish and save settings to master configuration.

temn.tafj.jdbc.driver = COM.ibm.db2.jdbc.app.DB2Driver
temn.tafj.jdbc.url = jdbc:db2://10.44.5.224:5032:T24_DB03
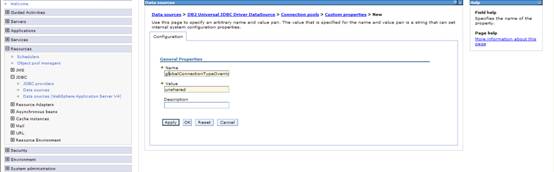
Setting Connection Type
Procedure
- Click Resources > JDBC > Data Source > TAFJ XA DB2 Data source > Connection pools > Custom properties > New.
- Set the new Custom property globalConnectionTypeOverride to unshared.
- Click OK and save the changes to the master configuration.
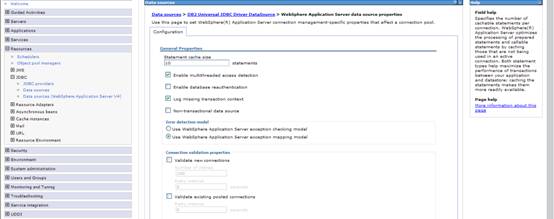
Setting Data source multithread for DB2
Procedure
- Click Resources > JDBC > Data Source > TAFJ XA DB2 Data source > WebSphere Application server data source properties.
- Select the Enable multithreaded access detection check box.
- Click OK and save the changes to the master configuration.
Setting Data Source Isolation Level for DB2
Procedure
- Set the default transaction isolation level for new JDBC connections to READ COMMITTED (2).
- Click Resources > JDBC > Data Source > TAFJ XA DB2 Data source > Custom properties.
- Set webSphereDefaultIsolationLevel custom property to 2.

In this topic
