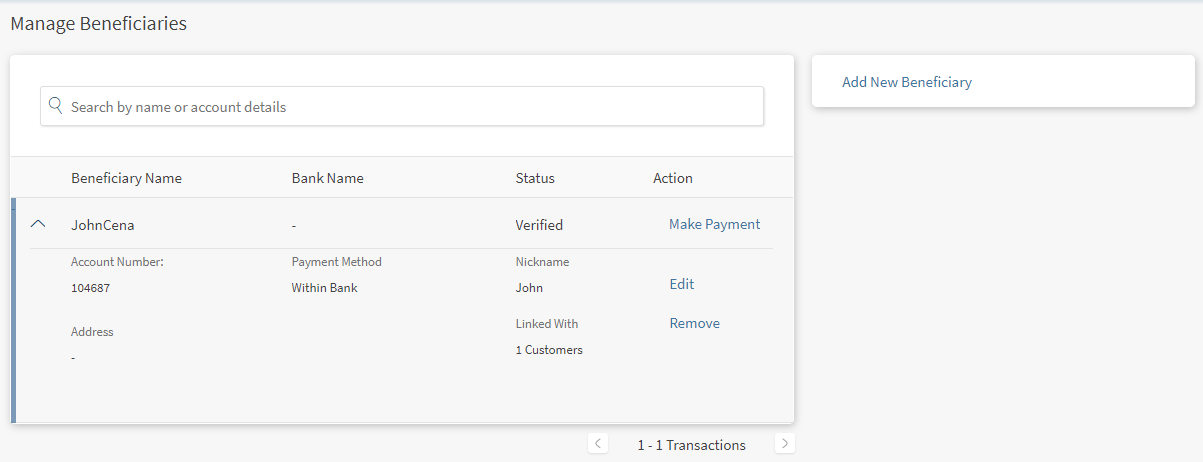
Manage Beneficiaries
In the digital banking application, the list of beneficiaries inside the Make Payment module, is displayed using the Beneficiary Management component. This component displays the list of beneficiaries based on the beneficiary type such as same bank account, P2P, Business, and International.
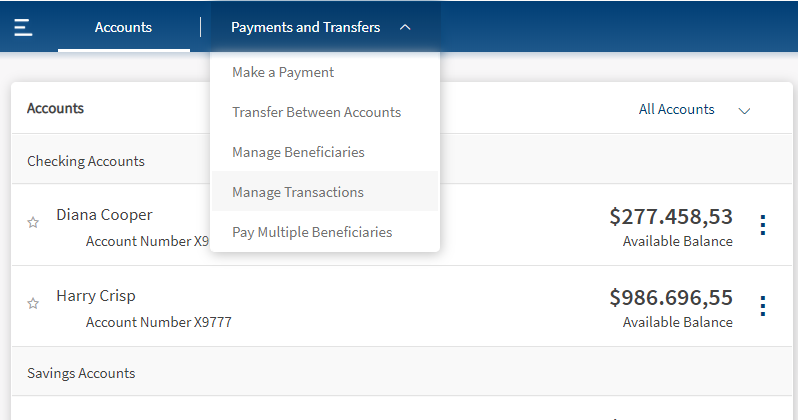
Use this feature to manage the beneficiaries added to your account.
Menu path: Accounts Dashboard > Payments and Transfers > Manage Beneficiaries
The Manage Beneficiaries screen appears. The following primary details are displayed in this screen:
- Beneficiary name
- Bank Name
- Status
Click the arrow displayed besides each row to view the additional details such as
- Account Number
- Nick Name
- Address
- Payment Method (International, Domestic, or P2P)
- Contracts (if any)
- Actions that can be performed such as
- Edit
- Remove
You can perform the following actions in this screen:
- Search for the beneficiary
- Make Payment to the existing beneficiaries
- Edit a beneficiary
- Remove a beneficiary
- Add a beneficiary
For detailed information on Manage Beneficiaries and the actions that can be performed in this screen, click here.
Business Process Diagram - Savings Pot

Add Beneficiaries
The list of beneficiaries added in the UTF is displayed under Manage Beneficiaries module. This screen displays the list of beneficiaries added based on the beneficiary type such as same account, domestic, P2P, and International.
Menu path:
- OLB: Accounts Dashboard > Unified Transfers Flow
- MB: Hamburger menu > Unified Transfers Flow
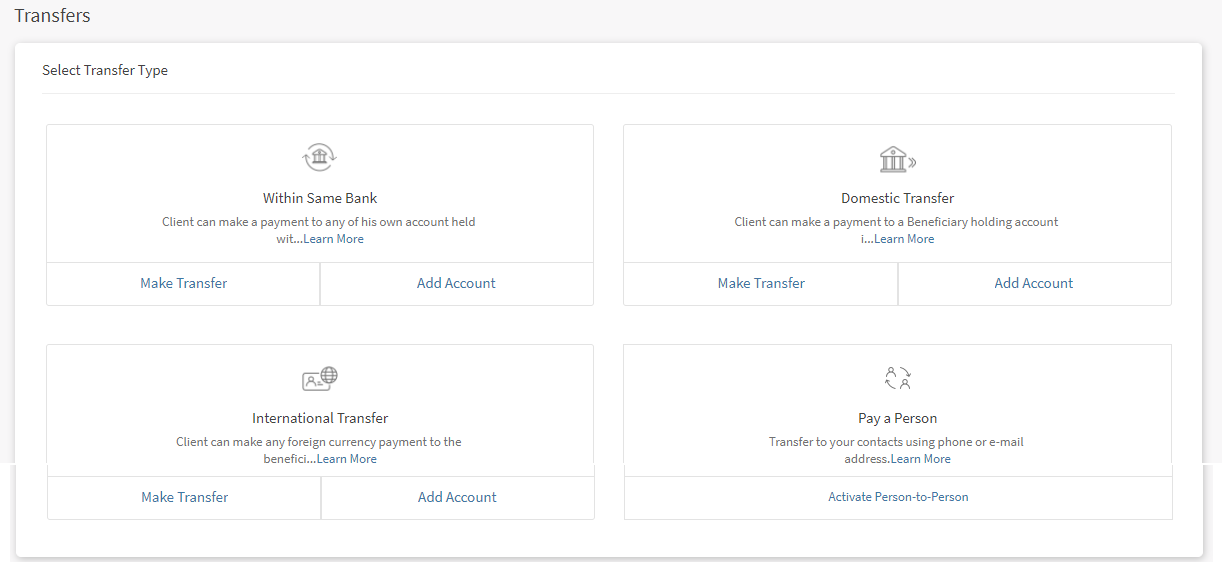
The Unified Transfers Flow screen appears with the list of transfer types and actions that can be performed against each transfer type. Click Add Account displayed against each transfer type to add a beneficiary for the selected account type
You can add the following beneficiary accounts:
- Same Bank Account who has an account in the same bank.
- Domestic Account who has a domestic account in another bank.
- International Account who has an account in an international bank.
- Person-to-Person Recipient to transfer money using the person's email ID, mobile number, or National ID.
Add Same Bank Account
Use the feature to add a beneficiary who has an account in the same bank. Click from Add New Account under Within Same Bank on Unified Transfers screen.
The app displays the form to enter the account details.
- Payee Name. Enter the name of the payee.
NOTE: Once you enter the account number in the two fields, the correct payee name is fetched from the core and displayed. The back-end service verifies the account number against the payee name. In case they do not match, the app displays an error message requesting the user to correct the details and try again.
- Account Number. Enter the account number of the recipient.
- Re-Enter Account Number. Re-enter the account number provided in the previous field.
- Account Nickname (Optional). Enter a nickname for the payee.
- Payee Details (Optional). Enter the payee details. This section includes the following details:
- Phone Number
- Email Address
- Address details that includes Address Line 01, 02, City, State. Country. and Zip Code.
- Enter the required information and click Continue. The app displays Link Payee screen.
NOTE: This screen is displayed only if you have access to at least two Customer IDs.
- Select the contract from the list of contracts to link the payee. This page displays the list of contracts available.
 The following information is displayed:
- Contract
- Identity Number
- Selected CIF
You can do the following:
- Click the check box to select a contract.
- Click Select All to select all the contracts.
- Click the down arrow beside a contract to view the additional details such as:
- Customer Name
- Customer ID
- Click Cancel to cancel the operation.
- You can go back to the previous screen by clicking Back.
- Click Continue after selecting the contract(s). The Confirmation screen is displayed.
- You can Cancel the operation. In the pop-up that appears, confirm the cancellation to return to Unified Transfers screen.
- You can Modify the details before adding the account.
NOTE: You can also navigate to adding other recipient accounts by clicking the required option from the right pane of the screen.
- Verify the entered details and click Confirm to add the payee.
NOTE: Continue button will be enabled only after selecting a contract.
The app displays the acknowledgment screen with an acknowledgment message and account details confirming that the payee has been added. The account is added to the list of accounts in the To list of the "Other Infinity Bank Members" transfer type on the Make Transfers screen.
The acknowledgment screen displays the transaction details, unique reference number to the transaction, and provision to do the following:
- Make a transfer
- Add another recipient
Add Domestic/International Account
Use the feature to add a payee who has an account in another bank (domestic account) or add your own account available in another bank by providing the required information. Click Add Domestic account from the Unified Transfers screen.
The app displays the domestic account tab with a form to enter the account details.
Enter the following details:
- Payee Name. Enter the name of the payee.
- Account Number. Enter the account number of the recipient.
- Re-Enter Account Number. Re-enter the account number provided in the previous field.
NOTE: Enter any one of the following three fields.
- SWIFT/BIC
- Clearing Code
- Bank Name
- Click Look Up to automatically detect the SWIFT/BIC. Clicking on Look Up will display a pop up with the privilege to search the SWIFT/BIC details. Search by providing the following details to pick the right SWIFT/BIC:
- Bank Name
- Branch code
- Country
- City
- Account Nickname (Optional). Enter a nickname for the payee.
- Payee Details (Optional). Enter the payee details. This section includes the following details:
- Phone Number
- Email Address
- Address details that includes Address Line 01, 02, City, State. Country. and Zip Code.
- Enter the required information and click Continue. The app displays Link Payee screen. This page displays the list of contracts available.
NOTE: This screen is displayed only if you have access to at least two Customer IDs.
- Select the contract from the list of contracts to link the payee. The following information is displayed:
- Contract
- Identity Number
- Selected CIF
You can do the following:
- Click the check box to select a contract.
- Click Select All to select all the contracts.
- Click the down arrow beside a contract to view the additional details such as:
- Customer Name
- Customer ID
- Click Cancel to cancel the operation.
- Click Back to go back to the previous screen
- Click Continue after selecting the contract(s). The Confirmation screen is displayed.
NOTE: Continue button will be enabled only after selecting a contract.
- You can Cancel the operation. In the pop-up that appears, confirm the cancellation to return to Unified Transfers screen.
- You can modify the details before adding the account.
NOTE: You can also navigate to adding other recipient accounts by clicking the required option from the right pane of the screen.
- Verify the entered details and click Confirm to add the payee.
The app displays the acknowledgment screen with an acknowledgment message and account details confirming that the payee has been added. The account is added to the list of accounts in the To list of the "Other Domestic/International" transfer type on the Make Transfers screen.
The acknowledgment screen displays the transaction details, unique reference number to the transaction, and provision to do the following:
- Transfer Activities
- New Transfer
Add P2P Account
Use the feature to add a P2P account by using the payee's mobile number or email ID.
Activate P2P
To perform a person-to-person transfer, you must activate the p2p feature.

To activate person-to-person feature, perform the following steps:
- Click Unified Transfers Flow from the side menu. The Unified Transfers screen appears with the list of account types.
- Under Pay a person, click Activate Person-to-Person.
- When you open the P2P screen for the first time, the app displays the terms and conditions for you to activate the P2P payment service.
- Click Proceed. The P2P screen appears with your account details.
- The app displays the following details:
- Your name
- Registered Phone
- Registered Email
- National ID with text box for your input
- Default account for sending the amount
- Confirm the details to activate P2P payments, but you can also edit them if required.
If you have multiple eligible accounts, you can select the preferred account for using the P2P payment service (for sending and receiving money).
- Once P2P is activated, a confirmation message is displayed with your details. You can send and receive money via your email ID or mobile number.
Add P2P Account
Click Add Account from Unified Transfers screen under Pay a Person in Unfied Transfers screen. The app displays the P2P account tab with a form to enter the account details.
Enter the following details:
- Payee Name. Enter the name of the payee.
- Contact Information Type (Phone Number, Email ID, or National ID):
- Phone Number. Enter the phone number of the payee.
- Email Address. Enter the email ID of the payee.
- National ID. Enter the National ID of the payee
- Account Nickname (optional). Enter the nickname of the payee.
- Click Continue.
- You can Cancel the operation. In the pop-up that appears, confirm the cancellation to return to Unified Transfers screen.
- You can modify the details before adding the account.
NOTE: You can also navigate to adding other recipient accounts by clicking the required option from the right pane of the screen.
- Verify the entered details and click Confirm to add the payee.
The app displays the acknowledgment screen with an acknowledgment message and account details confirming that the payee has been added. The account is added to the list of accounts in the To list of the "P2P" transfer type on the Make Transfers screen.
The acknowledgment screen displays the transaction details, unique reference number to the transaction, and provision to do the following:
- New transfer
- Transfer Activities
In this topic
